Ravelly Followers

Reminder

If you are a "non-responder or OpenID-er" which to me means I have no way of responding to a comment that you've left, please leave a way for me to get in touch with you, especially if you're participating in a blog give-away or if you are asking for information or links.
By leaving your email within your comment, I can find you. I realize that this is sometimes a scary thing to do with scams and all but if you disguise the email as say.....
me at yahoo dot com
this is the perfect way to hide from the unwanted eye. So please help me out if you are one of the non-responders.
Thank you, in advance.....Ravelly Rhonda!!
Showing posts with label From My Stash. Show all posts

Nov 5, 2018

Retreat, Then Home

This past weekend, my Wacky group went on retreat. We decided to only bring hand work. For two and a half days we stitched and laughed and ate. When I arrived home Mr. Cowboy asked to see what I'd accomplished. I showed him my progress. Needless to say, he was stunned at the small amount of done....hehehehehehehehe. I told him not to worry about it if he wanted his dinner...;-]

A girlfriend asked me to make her a small quilt for a veteran in her area. I'd been looking at this eagle for awhile so I dug in my stash for a background and got started.

This sky fabric is perfect.

All the inners were carefully cut out. This took quite a bit of time, by the way.

And here it is pressed onto the sky fabric.  More to come in a few days!!


Mar 13, 2017

Backing?! Arrrragh!

My girlfriend Molly has invited the rest of her "wacky" girlfriends to make instead of purchasing our own backing. This is a good thing & a bad thing. Good because backing is expensive; bad because it takes nearly just as long to make backing, for me, as it did the top. Laugh out loud! I just cannot willy-nilly sew pieces of fabric together that aren't to my liking/color coordinated......just can't!!! So this process is probably my fault. But I must say that if/when the back finally comes together I'll be very happy. Stay tuned for more on this slow journey!

Sep 14, 2016

Mini Wednesday

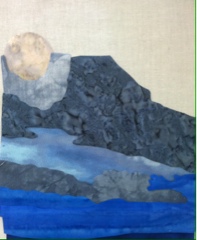
"Full Moon" is what I've named this piece. It is done in shades of blue, of which I have very few scraps.
I found a clipart pic and added to it to suit my needs. 
The following photos are in reverse of how the finish came about.
The color blue is, for some reason, is not a fabric I purchase often. Hummmm, maybe it's time to go shopping!! Just kidding, I think.
Since I'm determined to use only scraps, I really had to dig deep to the bottom of my bin. I don't even have muslin. When in the world did I use all my muslin?? I guess I'll have to make a run to my local quilt shop.....hehehehehe!!


As you can see I've used the last piece of muslin for the foundation.
I don't always use a foundation on my pieces but it does stabilize a small piece.


Jun 6, 2016

Opposites Attract Challenge Blog Hop

Marian from Seamstobesew has done it again! What a wonderful challenging blog hop this is. Two, no more than three colors in a mini quilt.  But I'm getting ahead of myself.

Schedule for today......
You are here at Ravelly1
Make sure you visit all the bloggers to see all the great creations they've done!!

The fantastic give-aways....

First, there's the $25 gift certificate from The Fat Quarter Shop. You can really find some "wonderful-ness" there for sure!!!
Then, there's a stupendous give-away from DJ Inkers of their Kids All Year CD. How exciting is that!!!


Details on how to participate in today's give-aways......
Just leave a comment mentioning your two favorite colors!! That's all it takes to be considered. Marian will announce the winners each day on her blog. So please do check in with her.

Now, back to the main event.....
I took up the challenge, dug into my stash and came up with two unlikely fabrics.
I've had these two in my stash for many years, can't remember or imagine why I purchased them in the first place.

I chose a quick design block which consist of two and three inch strips.


Here, I've sewn and cut four blocks just to see if my idea is going to work. I like what I see, so, onward!!

Sixteen blocks later I can see a secondary design along with the spinning star design.

Next, I added a border.


With pins, a choice of thread, my trusty adhesive spray and a backing fabric, it's time to get this mini quilted.

I decided to stitch around the star design.


All done & bound!! A 17 inch square mini quilt I've named " Cosmic Spinner Dance."

Finally, I'd like to show you all a little quilt that I designed but never quilted years ago. It measures 24" square. Maybe I'll get it quilted soon but don't count on it. I'm already eyeing a new project.
Don't forget to leave a comment mentioning your two favorite colors. BTW, my two very favorite colors are shades of Green and  shades of Gray. I'm mad about them.


May 25, 2016

Mini Wednesday

I love this sky fabric with all those wonderful colors.

I'd sure you can already see the beginnings of a covered wagon.

It was so much fun finding a woodzy fabric in my stash.

Finding stones was easy plus I added the shadow under the wagon.

All finished except the stitching down and quilting which I'll get to sometime in the next couple of weeks. I'm naming this one "Wagons Hoooo!" I remember the old western wagon masters issuing that command. 
Next.
These fabrics were enlisted for my next mini but I did change one fabric.

The witch and kitties are all cut out and ready to go.

Two trees with character look very spooky.

I'm beginning to wonder about the fence fabric. It's too distracting.

I like it even less at this point. Time to make a change.

This is much better. A very dark gray for the fence. I'm thinking this one will be named. "On a Clear Night!" But, I may change my mind before too long. This one hasn't been stitched down or quilted either. Soon!!


Feb 29, 2016

So, I Was Inspired...........

Warning....this post is photo heavy.
This is Design Wall Monday sponsored by Judy over at Patchwork Times. Make sure you pop in to see what others are up to.
So, I was inspired by a wonderful lady who took one of my landscaping classes. She had recently visited another country and loved one of the places of worship (the photo above is not what sparked her interest). That got me thinking about something I hadn't tried. So off I went to do research the different types of places to worship and OMG there were so many ideas my head nearly exploded. I started sketching from clipart ideas, then filled that in with crayons and tiny scraps of fabric.
As you know, I love taking pics of my progress because 1. it keeps me on track, somewhat 2. I can easily see what does and doesn't work & 3. I love sharing with all my blogger friends. With that said, here's how the above block developed:

The grayish roof only seems to work with a tiny black underlining.

Everything so far is worked out on my non-stick pressing sheet. Underneath each window I used a gray crayon to shadow then pressed to seal or melt the area. (BTW, I used a sheet of copy paper between the iron and crayon markings.....wouldn't want crayon on my iron...hehehehehe)

Too much forest background.

I added a bit of sky to break up all that greenery, then added a bush or two at the back of the building.
All the fabrics are from my stash. I just love digging for just the right pieces. It's amazing how many greens are in my stash. Have I mentioned that I am in love with green. I have to make myself turn away from that color when purchasing fabric.....LOL....it's not easy.
I absolutely love this brick type fabric here. It was hard to cut into but I closed my eyes and did it.

I needed a similar color for the tower so off to the stash I went. I must say, digging through the piles and piles of fabric is therapeutic. Who else can relate to what I'm talking about?? I feel comforted in all that fabric. The colors, the smell, the feel of it, the...... oh, ah, sorry. Now where was I?

Add some windows to the mix.

This block is looking a bit naked. I am going for a church on a grassy hill but it's not quite there.

 Adding more of a rocky area underneath the church adds that illusion of up on a hill but it needs more.

A row of bushes evens it all out!! This is my favorite block so far.
Can you believe, I forgot to take the beginning pics.....sorry!!!!

I'm still using green whenever I can. This ties the blocks together and I get rid of to use lots.
Mr. Cowboy saw the tree and said that it was just too tall and overpowering. 

He was right! This one is much better.
Well, that's all for now. I'm planning on making 9 to 12 blocks but that may change.
So far each block is 12" square but I may trim them to a smaller measurement later.


;-}

Don't count the days, make the days count!

Hands2Help

H2H 2013 logo

LinkWithin

Related Posts with Thumbnails

Hop