Ravelly Followers

Reminder

If you are a "non-responder or OpenID-er" which to me means I have no way of responding to a comment that you've left, please leave a way for me to get in touch with you, especially if you're participating in a blog give-away or if you are asking for information or links.
By leaving your email within your comment, I can find you. I realize that this is sometimes a scary thing to do with scams and all but if you disguise the email as say.....
me at yahoo dot com
this is the perfect way to hide from the unwanted eye. So please help me out if you are one of the non-responders.
Thank you, in advance.....Ravelly Rhonda!!
Showing posts with label How-To. Show all posts

Nov 25, 2018

Old Dog - New Trick


So I was channel surfing this morning, can't remember which show but they mentioned something called "word cloud" and showed a pic of one. I was instantly interested and grabbed the old computer and googled it.
 Back story, I'd seen many of these kinds of things but never heard the name or been able to find anyone who knew how they were made. 
Google had several youtube videos on the subject and after watching a couple I learned that it was easy (well not for me. I had to watch the videos MANY times, gave up, used my iPad to pull them up so I could figure things out step by step with the computer right beside). I was in luck because I have Microsoft Word and PowerPoint programs which I use quite often. This was great!!!
Starting and stopping the video helped me to upload the necessary program to get started with my word cloud and above is my first finished one. I am so proud of this old dog who learned a new trick.
What's your old dog/new trick story? I love to hear from you.
 

Jul 22, 2014

Grape Jelly

Whew!
 Here's a quick recap of my Mustang grape canning escapades ....
After fermenting over night. The smell is wonderful.
After boiling & simmering for an hour or so.
Here's how the grapes look after I pulverized them a couple of times.
Final results - 4qts, 8pts, 4 half pts.
There are loads more grapes on the vine but do I have the energy to pick and process them. Only time will tell but this old girl is tiring!!!!!!!
While I was canning my Cowboy came in from golfing with his buddies & had changed into his work boots to begin cutting in the hay fields. He decided to leave the golfing attire on. I just had to snap this photo.


Jun 23, 2014

Monday, Monday

Remember to pop over to Judy's for Design Wall Monday to see what other are up to!!

I've been stuck on the fractured diamond  for a week. All the possibilities were circling around in my head.
This first one was made from the above "kite" type template which is very easy to make.
This next one is my favorite because the diamonds are floating free. I made another template making the square a half inch larger which lends for a wider space at the bottom of each block. When all  blocks are sewn together, you see more of the background fabric.

Notice the square in this template and the width of the pointed wedge at the bottom of the photo. This kite is not as wide as the others. This will allow the diamond to become more distorted and will float each diamond, as well.

All three of these will go to the helping hands ladies after I've quilted them. Each is about 36 inches which is ideal for their needs.
Hopefully, the fractured diamond thingy is out of my system for awhile and thankfully a large portion of my scraps are gone.


Aug 6, 2013

Things Texas Revisited

A new blogging friend asked about the patterns to my "Things Texas" quilt. I had to think really hard about where those patterns were. It took me a couple of weeks to dig them out. I decided to re-post about the process and share the patterns with anyone who's interested.
As you can see from the photo, there are lots of what I call blank spaces throughout some of the designs. I am linking to my tutorial about how to do this particular process. It's a bit time consuming but well worth the effort.

  • Below are the patterns I used. Just right click on each page then copy and paste them into you own document. You can then enlarge each pattern to your desire.
  • I chose fabrics that would show off the silhouettes.
  • I used Steam-a-seam or Heat-n-Bond as an adhesive backing on the black silhouette fabric.
  • Note: One thing I failed to mention in the last video is that I had removed the adhesive before the final placement and pressing.
  • After pressing the silhouettes into place, I stitch the raw edges into place stitching as close to the edges of each pattern as possible.
  • The videos were made in August 2009 where I mentions a silhouette give away of that cow. Well obviously that was years ago but I do have a little surprise this August 2013. Scan down to the bottom of this post to see what's up.

 
The tiger is an example of another way to use an image as a silhouette and use more colors to jazz up the image.
It is my give away design for this particular post.
It is unfinished in that I have not stitched it down, never got around to it so it landed in my UFO box......LOL.
If you are interested in this unfinished block measuring
 approximately 12 1/2 inches just leave a comment and mention
 your favorite
animal
 and it's that easy!!


Mar 14, 2012

Final Step and Done

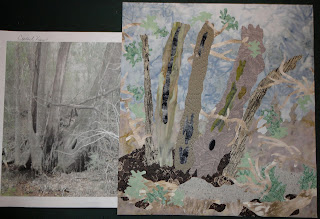
I eked out some time to finish my woodsy project. Now, mind you, this is my take on the photo, which means I can choose to alter the photo to suit what I want to achieve. You know how we quilters are. We see and love a pattern, design or block and sometimes change it to make it ours.

 I think it's important to take photos as you go because it allows you to see what needs to be added or taken away. This way you can evaluate what you're doing with perspective. Sort of like squinting at a block to see you've made a mistake.
The sky fabric I found and added to the backgrounds really helped to define the piece. I also added more shadows around the bottom of the little quilt.
 I then compared the original photo to the piece. I added more branches across the front of the rotted tree trunks and more shrubbery , as well.  I liked what I saw and pressed everything down before I changed my mind. Sometimes I tend to over think a project.... not good..... you can definitely go overboard.
The final piece measures 13 1/2 by 12 1/2 inches but I might trim it more later.  I just love the subtle colors mixed in with the dark shadows.
I have no idea of how I want to quilt it but I'll think of something.
What are your thoughts????

Mar 11, 2012

Step 2


Using a light box or light source, I've starting tracing the reverse side of the photo. I know my images are faint but that's alright with me. I used something called Dry Mounting Tissue. A box of it was given to me by a friend years ago and at the time I had no idea what to do with it. But it has really come in handy as an almost transparent product.
On each tissue I traced one component of the photo which will be matched with a fabric later. I used a Sharpie Permanent marker for tracing..... it's the only thing that won't wipe off.
Each traced component will now be traced onto the Steam-a-seam and then pressed to the back of the chosen fabric when I find the time to get to it.  
I'm afraid that life is about to get in the way for a few days so hang in there and stay tuned.

Mar 3, 2012

New Project.....Maybe.....Probably

As some of you may have noticed, I love to take photos of nature.
Most of the time a photo will wind up as a "header" on my blog but the photo below will possibly wind up as a small quilt. This dead tree combo is in an area in our back forty. I've passed by it many times but this time
something grabbed my attention and I snapped several shots. It has character and I love the soft background as if mist or fog is framing the area.
So I'm going to study the photo, draw out some ideas, pull out some fabrics and think/ponder some more. Whatever I do, I'll post my progress, so if you're interested in a how-to, feel free to follow along and join in the process with me. Remember, this is a learning experience and I'm learning right along with you.
This project will work for " hand and machine applique`rs," steam-a-seam-ers and any other method that works for you.  And I'm thinking that some of you advanced digitizers with those great machines could scan and digitize this photo into a program to stitch out. Now that would be really cool. I might even try that one. Now I'm really getting excited.
I'm already thinking about the perfect bark fabric..... I'm off to dig it out of my stash!!


;-}

Don't count the days, make the days count!

Hands2Help

H2H 2013 logo

LinkWithin

Related Posts with Thumbnails

Hop