Ravelly Followers

Reminder

If you are a "non-responder or OpenID-er" which to me means I have no way of responding to a comment that you've left, please leave a way for me to get in touch with you, especially if you're participating in a blog give-away or if you are asking for information or links.
By leaving your email within your comment, I can find you. I realize that this is sometimes a scary thing to do with scams and all but if you disguise the email as say.....
me at yahoo dot com
this is the perfect way to hide from the unwanted eye. So please help me out if you are one of the non-responders.
Thank you, in advance.....Ravelly Rhonda!!
Showing posts with label Stash Talk. Show all posts

Jan 20, 2014

Monday, Monday


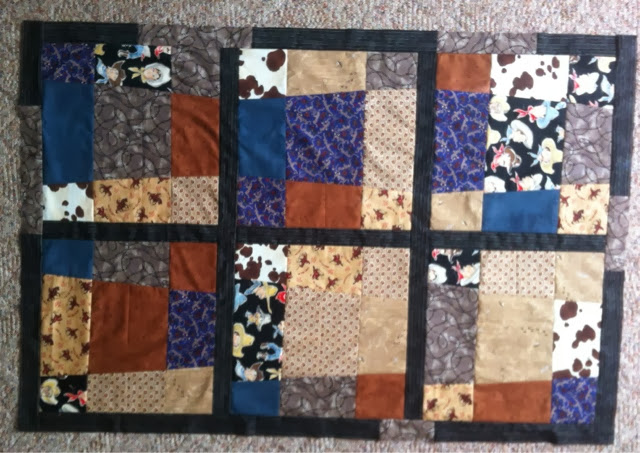
As you can see, I'm making the most of my "cowboy" fabrics.
These quilt tops will go to the helping hands ladies in my community who quilt them to be given to nursing homes clients, needy children & other groups.


Well, well, "Empty Diamonds" is finished & I'm so pleased with this one. Someone will want to snag it right up quickly!!
Making small quilt tops is a lot of fun. Can you see me smiling real big??  


This last quilt idea came from the rabbit fabric. I only had about a half yard left so I made the rabbit and daisy blocks. I also used a burnt orange fabric to bring brightness to the quilt.
 
 
So, I'm plugging along with quilt tops and new ideas..... all the fabrics used come from my stash which has not diminished one little bit and of course, now I have more strips to works with.............sigh!!
BTW, if you've noticed that some or most of the photos are askew, it's because I've been take them with my cell phone and can never seem to get directly over the top of the tops. You'd think I'd just go and get my regular camera but.....oh no, I'm determined to figure that cell phone app out.....
Make sure to pop over to Judy's sometime today, to see what others are up to!!


Jan 13, 2014

Monday, Monday


Two new quilts for my community helping hands. All fabrics from my stash. I've decided to do quilts from each theme of fabrics so "cowboy" is the theme for now until I get tired of making tops from those.........laugh out loud! 

Sep 11, 2013

House Haunters-Bow

House Haunters Block 2
is here.
 
As I mentioned last week, I'm using an 8 1/2 by 11 1/2 inch black mottled background. This weeks' block is probably the most detailed of all the blocks. I chose not to place shutters on my house. That's the only detail I excluded, I think.
I used the right and wrong sides of a couple of fabrics which makes a shadowed effect. 
I've used the same dark green fabric in each block as grass and a red chimney to add similarity to the blocks, as well.
 All fabrics are from my stash and the mess is growing by the day as I sift through said stash looking for just the right piece.

Note: You are welcome to enlarge or reduce this design.
 
So far this is what I have.........Love them!!!
 
Now, to a personal note........I've been missing little Buzzard Bait since she was moved to another pasture to graze......but I shouldn't have worried. She's as happy as a lamb in her new surrounding and still pushing her sisters out of the way at feeding time.
I should really stop saying "little" because she weigh about 500 lbs. now.


Aug 27, 2013

From My Garden - BOW

Greetings all. I'm back with my new BOW (Block of the Week).
 
This is a hand embroidery project which will take about 10 to 12 weeks depending
on how much I can keep ahead and get posted.....LOL
I'm starting with a brief video about the fabrics I'll be using throughout this process and the first block design.  These blocks are my own designs that I'm sharing with you, freely.
 
Just right click, copy and then paste on your clipboard or wherever you choose. I usually use a Word document or PowerPoint page to paste & print.......but don't listen to me because I really don't know much about how to paste anywhere else......I'm not savvy at all when it comes to all that stuff.
 

I'm using black DMC floss because that's what I have plenty of but of course this would look great as Redwork or Bluework, too.
 
Each Tuesday I'll post the next design page and my version.  I hope you'll join in this experience with me.
Addendum
Sorry, I failed to mention what exactly this block is.
It's one half of a peach and the pit.
 

Jun 18, 2013

Staging Tutorial

What is staging? It's also known as auditioning fabrics for a project.
I'll be using, as examples, my fish BOW.
In my stash,  I have fabrics that can be used as backgrounds, foliage, landscape, etc. Usually I find these types of fabrics in scrap bins at the my local quilt store. A lot of them are at least an eighth to a fat quarter portion, which are great sizes for projects.
Look that this pebble fabric. Lots of interest there.

Then there's this grassy fabric and a motley blue. Great possibilities.
 
If you are following with my fish BOW (Block of the Week), you know that I use an adhesive (Steam-a-seam or Heat-n-bond) to adhere the fish parts and at this point I can move the fish to different fabrics to see what works best.
I like what I see but am not ready to press anything down. That will come "way" later!!

After adding a couple of dragonflies and cattails, it's starting to look pretty good but still not ready to press. That may happen in a couple of weeks. There is no hurry with pressing everything down. If you are satisfied with the look you're going for, I'd suggest taking a photo but do not press yet. This is important because at some point you will probably change your mind or want to add something behind one of your objects and would regret pressing too early.

Here's the second fish  which I posted on Monday and here's the staging for that one. You can see the pebbles that I've used cut in a jagged way to look more natural. Still no pressing. I also added that grass fabric but cut it to look like underwater weeds.
So this is the process I usually use when making scenic quilts.
If you are making the "fish" designs with me, maybe think about doing a different scene for each fish. The guy in your life will be so proud and want to show off his prized quilt to everyone.
Stay tuned for more "staging" very soon.
 
Also there's still time to get in on the 5 ten inch squares give-away. Just leave a comment to be counted.
 I'll announce the winner on Thursday.


Jun 5, 2013

In My Stash

It's got potential, don't you think!! I was rummaging through my stash when what to my wondering eyes should appear but a fat yard of fabric I had purchased one year.  Sorry about the bad rhyming....I just couldn't resist.  So this is the type of fabric I love to use in a lot of my pictorial/landscape blocks. I'll need to dig a little deeper in that stash. I couldn't believe my lucky find. My brain is working furiously to come up with an idea to use this piece in.
 
 Next up.....today I'm sewing up a bunch of strips, cutting them on the diagonal into 3 inch blocks and will do something with those blocks later. Maybe a border on another quilt....who knows.
 
Warning: If you haven't looked through your stash in a while, get in there and dig. You might have forgotten what you've purchased, like I did.
Onward!!


May 20, 2013

DWM

What a ride I've had this past week which had little to do with sewing but I knew that Monday was fast approaching so I'd need to do something for DWM. Thank goodness for Judy who is the hostess for this uplifting experience each week. Make sure you pop over to see what others are creating!

Here's what I've been up to this past week.
 
What's this, you ask??
Is it pieces of paper for the trash?
Possibly some sort of art?
None of the above. This is my stash of Steam-a-Seam snippets, strips, corners, and bits.
This adhesive is expensive, so I keep an old box handy to store the adhesive until another project comes up and I go digging for bits.
 

I used said bits on my new string project. I've had the zebra type fabric in my stash for years with no real idea of what to do......has anyone else been in that situation???
I decided to make another string quilt using a muslin foundation. These blocks were cut
7 1/2" by 8 1/4".......why that particular measurement, you might ask.......well, I have a very simple answer........I was not looking at my ruler markings before I'd cut "many" blocks, so I was stuck with I made an executive decisions to use that measurement.
When making an elongated string and using a defined center strip, half of the blocks needs to run on the diagonal in one direction and the other half in the opposite diagonal direction.  Learned that one the hard way!!

I decided to outline the zebra type fabric with a black fabric in different sided strips, along with varied green fabrics so that I wouldn't have to match seams......this keeps things very simple and easy......no thinking involved....LOL
I did a secondary design using varied red fabrics on the inside tip of each block, only. This lends the X's and O's effect. Also, there's a diamond design involved.

I love the look of this and need to make 18 more blocks. I'm planning a piano key border using the rest of all those green fabrics with zebra and red fabrics sprinkled throughout.
All fabrics have come from my stash and as you can already guess, the stash has multiplied. I'm losing ground, becoming over-run in scraps....drowning in strips, suffocating.......sorry, I got carried away. 


Apr 24, 2013

Barn #4 Plus Tutorial

I decided to show a little of the process I use when making these blocks.
First, sketch out the design, which may have just the basics. This one is very basic. I tend to add to it later only in fabric form.
(This is a free design that I'm sharing with everyone)

After tracing out the design parts onto my favorite adhesive....say it with me...Steam-a-Seam.....you all know me so well....I then choose fabrics from my stash that best represents what I'm seeing in my head, which is a scary thought, indeed!!
After cutting the pieces out, I press the barn pieces together when at all possible. A tentative  background is chosen and auditioned.
I am not liking this one at all. Hummmmm, back to the stash.

This is more appealing but not quite it, yet.

I like to play around with the slanted options which, in this case, looks like fields in the background.

The blue clouds fabric I'm using is the back side. It's a little more subtle than the right side.

I've turn one corner over so that you can see the difference. I often use the back side of fabrics. A quilter spoke about it years ago. I think it was Mary Ellen Hopkins who did a lecture about the wrong side of fabric. Click on the photo to make it larger.

At this point, I have not pressed anything to the background. I'm looking at it from several angles. I also take a photo of it to see if it needs any changes. You'd be surprised how helpful that little tip is to us quilters.

This is the final version and I've pressed it down. I like it a lot.
I am trying not to buy much fabric this year. Of course there are times that my stash doesn't have the correct green, blue, tone on tone, red, black..... oh, sorry. You know how that goes.
I have one more block to make and then I'm calling it quits. After that, I'll get into how I want to place each barn, what are my filler blocks going to be, will I add something to tie the blocks all together.......woooo, I head is spinning!!!
Four so far


Mar 25, 2013

The Makings

Might I say to begin with....Buuuuurrrrrrr! It's freezing here in central Texas.....very unusual weather for us but apropos for the cold snap that always happens around Easter.

As most of you know, I am really into making mug rugs. So the other day I was thinking of one I really wanted to make using an owl. Of course, I'd need the appropriate fabrics so off to the old stash I went. Boy was it a thrill to look through all those scraps for just the right colors. I won't show you the mess I made because it was quite shameful but loads of fun.
First I made this little owl. I know, I should have placed a quarter next to him so that you could really appreciate how small he is. Sorry...hindsight and all.

Next came the leafless tree with shapely branches to add character.

Now to the background fabric. I was lucky to fine this dusky blue piece....love it but had to use it. I added a light blue moon to the mix which appears in the background.

Finally, I added the owl. Now all I have to do is quilt it and bind it. So you'll be seeing the mug rug in a future Thursday post with my "A is for Aardvark" BOW.

Make sure you pop over to Judy's to see what other are doing on this wonderful Design Wall Monday!
Also, if you are interested in donating a quilt or two, visit HERE to read about two heart-warming projects that need your help.

Oct 6, 2012

Quilt Jack-o-lantern Project


I used the backside of the background fabric, an orange batik that I've been hoarding for years for the face, a solid  darker orange for accent shading, a gray mottled fabric for the hat (BTW, I collect gray fabrics of all shades. They are really great as accents most of the time.), Moda black for shading, a very small piece of white-ish sliver fabric for the buckle and a dark green for the grass.
Of course, I used my favorite adhesive - Steam-a-seam! Maybe in the next couple of days I'll get everything stitched down and machine quilted. BTW, this little block is about 9 1/2 inches square.

Jul 13, 2012

Coming In August - Tea Time

No, it's never too hot for this project. Living in Texas in the summertime it's usually too hot to even think about drinking anything hot but this project does not require drinking.
I've been working on a new BOM which I've named "Tea Time" and of course it's all about teapots. This twelve month project is a great way to  dive into all those wonderful scraps you have laying around.  If you love tea or you're a collector of teapots and tea kettles, you might like to make a quilt to hang in your sewing room or kitchen area. 
Stay tuned in because August is when it begins. Start pulling some fabrics and think about background fabrics and threads.........I need to stop.......LOL......join in the fun......
See you in August!!!

Mar 17, 2012

National Quilting Day

 
To celebrate National Quilting Day, I decided to pick out some fabrics to start a new quilt I've been thinking about.  As most of you know, I'm really into "seals" ..... not the animal or the guy model..... I'm talking about symbols of authority, such as, the Texas seal.... remember that one??


So, this is the next project concerning seals. As I've said many times, for me the process of choosing fabrics is the hardest part because there's just so many colors to choose from and I want to get just the right shades.

When working on this kind of project, I use a color copy and a black/white, plus, I enlarge or shrink the design as desired.
I'll be using several techniques.... applique`, hand embroidery and silk purse, as well.


Here I've started the eagle. It's just on a non-stick pressing sheet for the moment. I'll add the talons later and the white tail feathers.
Happy National Quilting Day everyone!

Mar 7, 2012

No Border Yet

I've finished sewing the blocks together but haven't had time to even decide on a border. The blocks started with a base yellow fabric of 12 1/2 inches. The quilt top now measures 72 inches square. I just love the two designs that make up this quilt and I used lots of scraps ...... about 5 yards worth.
This quilt was a very quick one to complete and will go into my stash of quilts to be used one of these days.
 

Look at this wonderful quilt top a friend make using a 1/2 inch black strip between those beautiful batiks.
 Then there's this neat Disappearing Nine Patch quilt blocks. Can you believe that these started out as nine patches???

Finally, these blocks were from the last quilt my friend Jerri worked on before her illness took her. The woman could really put together the fabrics.

;-}

Don't count the days, make the days count!

Hands2Help

H2H 2013 logo

LinkWithin

Related Posts with Thumbnails

Hop