Ravelly Followers

Reminder

If you are a "non-responder or OpenID-er" which to me means I have no way of responding to a comment that you've left, please leave a way for me to get in touch with you, especially if you're participating in a blog give-away or if you are asking for information or links.
By leaving your email within your comment, I can find you. I realize that this is sometimes a scary thing to do with scams and all but if you disguise the email as say.....
me at yahoo dot com
this is the perfect way to hide from the unwanted eye. So please help me out if you are one of the non-responders.
Thank you, in advance.....Ravelly Rhonda!!
Showing posts with label Stash Busting. Show all posts

Jan 6, 2019

Sunday Evening String

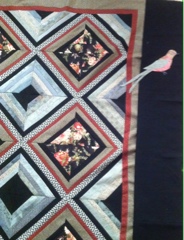
Greetings all! I didn't think I'd get back to sewing but Mr. Cowboy didn't need me for feeding so I was able to sew a couple of days and was able to finish the string quilt top.
I used a type of tissue paper as a foundation and had to peel off the pieces from the back of each block.  Whew! That took a bit of time.
Then it was on to the borders. Gene asked about the size of the blocks. They are 9 1/2 inches unfinished. Also, someone asked about the coordinating colors.....that's a funny story that I'm sure we've all had to deal with. The fabrics were in a box that got pushed back to the dark side of the closet...hehehehehe, so when I found it the other week I couldn't remember what I'd saved them for and there was no design instructions saved either. So, string it would be.


 After sewing on a 1 1/2 inch strip of the reddish fabric because I didn't have much of it left, I added a 4 inch strip of the moss green.

I really had to think about the last border because I knew I need to use black but it was going to look "non interesting!"  After sleeping on it, I came up with the idea of adding birds
I had a book by Bea Oglesby, "Birds - Flowers Album" which I love, so I've decided to place several birds around the black border. This first one is the Scissor-tailed Flycatcher.
I will also add branches and leaves. I plan to stitch each bird, branch and leaf onto the black border before I stitch that border onto the rest of the quilt. If some of the bird parts flow into the quilt, I'll fold that part out of the way, stitch the border to the quilt and then finish the part afterwards.


Apr 30, 2018

Mini Tutorial

Several of my blogger friends have expressed an interest as to how I go about making my minis. So I've decided to attempt to explain in a sort of step by step process.
BTW, this post is loaded with photos.
First, I like to either look thru photos that I've taken in the past or look at some of the clipart photos on the subject I'm interested in from the Internet.
Today I decided to do a sunrise or sunset scene. So I'll need to choose from several photos.
This photo has subtle colors and appears a bit foggy.
This photo could be a sunset on the plains.
I really like this photo and will probably to it another time.
This one I thought reminded me of one that one of my blogging friends mentioned that she was interested in making.
All these photos are from the Internet and they all are fascinating to me because of all the possibilities such as.....I'm seeing a mixture of fabrics I'd want to use. I love mixing batiks, solids, prints, florals, etc. 
I'll probably save the ones I don't choose at this time.
I like I'll work with the first photo. 
Now that I've chosen a photo to work with, I'll need to print out a copy.


With the chosen photo traced on the back, I'm thinking that I want to enlarge it a bit so off to the new printer (LOL) to get that done.  Note: The traced photo is in reverse. 

Now I've enlarged it 125% which means it's about 7 1/2" by 9" at this point.

Next I chose some fabrics to use. Sorry about the photo. The one in the very middle is a McKenna Ryan gradient fabric (love it) and the others are an assortment of batiks and some that read as solids.....which are gray, pale yellows and greens, a dark brown and I might choose other fabrics later.  I looked carefully at the photo I chose to get color ideas but it's easy to change or decide on another color scheme.
You see, it's not so hard to do this. I know you can too!!
Now, it's time to trace the design onto the Heat-n-Bond. This is where things get tricky because the parts need to be traced in pieces, such as the tree bark then the tree foliage, next.......  I'll demo to show how that's done.

I'm showing the chosen photo again, hopefully in a better light to finalize my color choices and to be able to compare the photo to me project as I go along.

I've numbered the sections that I'll be tracing just to keep up with every part.

I've chosen the McKenna Ryan piece as my foundation and background. Usually I'd us a muslin as a foundation then all my fabric choices on top but the Ryan piece has just the right colors that I'm looking for even though they don't quite match the actual photo. Remember, it's your project, so if you want to change colors or add something......that's the fun of it all.

Here I've traced off the different parts onto the Heat-n-Bond. Notice that the parts are separate and a bit larger that the actual pieces. This is for adjustments because more is better than not enough. So always give yourself more traced area because you can cut something down easily.

In this photo I wanted to show the difference in the right side and wrong side of the fabric, not because you don't know the difference but because sometimes the wrong side of the fabric is a better fit for what you are looking for than the right side.  Someone once told me, "Remember, we've paid for both sides."
All parts are not pressed to the wrong side of the fabrics I've chosen.

Now I've cut all my pieces out and laid them on the McKenna piece so that you can better see them.

Here you can see the non-stick pressing sheet that I use so that the Heat-n-Bond doesn't gum up my ironing board.

I'm now building from the ground up.

I really like the sun fabric I chose.
Here you see the whole thing before I press everything down.

Also, I like to compare the original to what I've done.


Here are all three. I'll probably do a bit of crayon work around the sun....YES, I said crayons. They are great to add some detail and depth. Just press using a sheet of paper or muslin between the project and your iron.
I hope this helps those of you who are interested in this type of thing. Please leave a comment if you care to. I love hearing from you.


Oct 13, 2017

Celebration At Last!

Bells are going off!
Confetti is floating in the air!
Hooray!!!! Post 1600 is finely here!!!!
I'm doing a happy dance right now and Mr. Cowboy is laughing his cowboy hat off watching me.
If you have stuck with me this long, you have definitely gone on a wild journey. Thanks for hanging around.
Now, let me give you an update on my venture into making quilts for the Veterans at my Senior Community Center. I have eight quilt tops made, four are already quilted so I've been on my knees getting the others sandwiched and ready to quilt.
My goal is to have them ready by November 1st. I can do it because these are small quilts. Just a token of my appreciation for the service of some wonderful men and women.
This particular quilt top I've had for many years with no real idea of what to do next but it's a great one to give to a Veteran. The photo is fuzzy for some reason....must be camera error!!!
This quilt I made last year and it's quilted as well. It's from my Fractured Star design. I added the white stars to give it a different look.
The winner of the final FQ is Joyce Carter whose favorite color is RED!!!!! Mr. Cowboy sends his congratulations because he was getting a bit worn out from pulling names from the old cowboy hat each week......LOL.  It's been so much fun doing these quilts for the Veterans and I thank each and everyone for participating and lending your suggestions.
I'll have photos in November of the festivities for the Veterans.
I hope everyone enjoys their weekend!!


Feb 23, 2017

Mini Wednesday

Oops! It's Mini Wednesday on a Thursday.  Sorry, I got busy with Mr. Cowboy, the warm weather we're having and cattle......sigh!!!
As you can see, I've chosen the Marines to do next. I've enlarged, cut and taped what I want to use.
With all these colors to choose from it should be easy to come up with a good design.

 
I decided to tackle the second inner circle with the lettering first because it's the most work with cutting and placing all the letters.
Here's a bit of trivia: Marine recruits are finished eating the moment their drill instructor is finished. That's why they eat so fast.
The beginnings of the eagle.
Eagle body all done to lay aside.
This next part was easy.....the globe and the western hemisphere (land mass).
Trivia again - Fewer than 100 people have ever received the title of "honorary Marine," which can only be bestowed by the Commandant of the Marine Corps. Here's just a small list: Chuck Norris, Bob Hope, Bugs Bunny, Jim Nabors and Gary Sinise.

Preview of how the eagle will be placed over the globe.
Eagle in place, holding a ribbon in its beak. I've also added a bit of highlights to the land mass.
The anchor and more ribbon are now pressed down. The ribbon has the Marine Corps motto "Semper Fidelis," which means "Always Faithful!"
More trivia...A 3-volley salute performed at funerals is sometimes confused with the 21 gun salute. The 3-volley salute is the firing of three rifle rounds over the graves of fallen armed forces members and political leaders.
I used a very pale green as the outermost circle and a mottled off white as the background.
Now there's four wonderful blocks done. I have at least one more before I decide if I want to finish everything or add some surprising blocks to the quilt.


Jan 18, 2017

Mini Wednesday

Whew!
I can't believe it's 2017 and mid January already.
It's been ages since I've done a mini.
This time I chose something that means a lot to me and my small community.  I chose to make the "Firefighter's" badge or shield. 
Here where I live, it's a very rural community with 3 volunteer fire departments. Any time there's a fire one or all jump into action to save lives, homes and property.

I found an image, blew it up and retraced the parts I will be using.
Notice that everything if already backwards so when I trace the parts onto my Steam-a-Seam, iron that onto my fabric and cut the parts out, all will be right side up.
Only a few letters to trace off.

These are the pieces with will make up the Maltese Cross which is an 8-point configuration.

The helmet, I high-lighted with a black Sharpie marker.


So far, so good.


Here's the finished piece (not quilted yet). If you're wondering about some of the objects, here's a bit of trivia. The bugle behind the helmet was used in the early years to issue orders to the firefighters.  Some badges like this one show a pike pole, axe and ladder. This collection to elements are called a "scramble" and are always located in the center of the Maltese Cross.
I salute all fire departments!!!!!


Nov 16, 2016

Mini Wednesday

It's deer season here in Texas. We have plenty of the critters roaming around the pastures & lake along with wild hogs, some ducks & a couple of beavers Mr. Cowboy is attempting to trap (hunt)!!
This mini is in honor of the deer which we do not hunt.
I've traced the design onto adhesive.
Here are at least two fabrics I'll use.
Here love cut the silhouette & placed it on the wrong side of the dark sky fabric.
The next few photos are of placement. I've also added a background batik fabric.

Here's the finale. I added a tree that's leaning on the others just for a bit of interest. It measures 10 1/2 by 9 3/4 inches.


;-}

Don't count the days, make the days count!

Hands2Help

H2H 2013 logo

LinkWithin

Related Posts with Thumbnails

Hop