Ravelly Followers

Reminder

If you are a "non-responder or OpenID-er" which to me means I have no way of responding to a comment that you've left, please leave a way for me to get in touch with you, especially if you're participating in a blog give-away or if you are asking for information or links.
By leaving your email within your comment, I can find you. I realize that this is sometimes a scary thing to do with scams and all but if you disguise the email as say.....
me at yahoo dot com
this is the perfect way to hide from the unwanted eye. So please help me out if you are one of the non-responders.
Thank you, in advance.....Ravelly Rhonda!!
Showing posts with label Sew It. Show all posts

Feb 4, 2014

Inquisitive

 
First....if you're looking for a new project in 2014, try out my "Lazy Hearts" BOM.
 It's from a project I designed a couple of years ago and it's free.  I love sharing with everyone.  Just click on my BOM & BOW page near the top of my blog to find all the designs.


Milkshake is investigating the bottom of a mineral bucket.
 "What's all the fuss about taking you vitamins," is the caption I'm giving this one. 
 She is too funny to watch and that white "Nike" mark above her eye is so unusual, it makes her look like a mischievous  child. Her mommy is, as always, neck deep in the feeder. Little Milkshake as become a very independent girl........LOL


Aug 10, 2013

Dug-out!

The other day a couple of my blogging friends asked about some projects I've been working on in the "comment" pop-up.
I went into my sewing studio/room and got to digging around for the designs. I'd just seen and used them, why in the world weren't they right where I'd put them???
Dig.......bump into a stack of book knocking them over.........look high and low........surely I didn't throw them away.........dig in the trash can.........look under the ironing board........look on top of the ironing board.........oh maybe I put them near my sewing machine.........nope.....nowhere to be found.......just when I was about to give up, I opened a shelf door and there they were right where I'd put them so I wouldn't forget where I put them.....did I mention that I've just turned 58 years old and the memory is not what it used to be....LOL
As Jeff Foxworthy would say, "They were in the last place it looked." If you aren't familiar with that little joke, it's a good one.
 
 The "Crazy Nine-Patch"
This design was published
 by
Fons and Porter's For the Love of Quilting
November/December 2000
 
It is one of my favorites because it's quick no matter how many blocks you make or how large each square is. I've made two already this week alone.

The one above was designed around a FQ of Fun with Dick & Jane fabric I've had for several years. The squares were nine 18 1/2 inches in varied colors that matches the Dick & Jane fabric. I only made the nine but the quilt in the magazine has 36 which are smaller than mine. I added cornerstones to each of my quilts because I wanted to use as much of my favorite fabrics as possible but the possibilities are endless.
Hopefully if you click on the photo of the instructions it should enlarge it enough to read. If not, let me know and I'll think of something...LOL


The Santa design is the one I used in the Ho Ho Ho Blog Hop and someone asked about it.
BTW, I will announce the winner of this wonderful Santa and a red FQ on
 Monday, August 12, 2013.


Apr 29, 2013

At Last

Pop over the Judy's to see what other are up to on this Design Wall Monday.

I finally finished the last barn. I totally loved this whole process from.....in my head, to drafting/sketching, to tracing, to choosing fabrics, to the actual blocks.
This may be my favorite barn.
Which is your favorite and why? I'd love to know what you're thinking.

This barn design is free to copy.


Oct 31, 2012

Leafing Through The Year - BOM - Block #11 & Tea Time Teapot Block 4

It's the end of October and a day early to post my two 
BOM free patterns.


Block #11
Just in case I forgot to add the link on my Sidebar!!!


WOW!
It's also time for my
Tea Time Block #4.
Thank goodness I looked at a calendar!
Hopefully, I've also added the link to my Sidebar!

Oct 6, 2012

Quilt Jack-o-lantern Project


I used the backside of the background fabric, an orange batik that I've been hoarding for years for the face, a solid  darker orange for accent shading, a gray mottled fabric for the hat (BTW, I collect gray fabrics of all shades. They are really great as accents most of the time.), Moda black for shading, a very small piece of white-ish sliver fabric for the buckle and a dark green for the grass.
Of course, I used my favorite adhesive - Steam-a-seam! Maybe in the next couple of days I'll get everything stitched down and machine quilted. BTW, this little block is about 9 1/2 inches square.

May 16, 2012

Progress....

Well, I've now gotten the 36 blocks made so I'll need to square up each block to 8 1/2". Then I'll be able to sew everything together.
I made 2 blocks at a time because I had to continually look at the original block....  one wrongly turned HST and there would have been lots of ripping in my  life..... as it was I only had to rip one block.
I will take a small break in order to can another batch of cucumbers.... stay tuned.

Apr 9, 2012

Stars for QOV


This is my Design Wall Monday.... make sure you pop over to Judy's to see what others are up to.

After re-reading the instructions for the QOV...... you know me..... sew first, read later..... LOL
I went back and added a sprinkle of varied shaped stars on the quilt top..... I really like this better. As soon as I get the borders sewn on, I'll be sending this baby off.

Apr 5, 2012

QOV

I'm working on a Quilts of Valor  that Marjorie is hosting, and am making progress. There's a "GO" challenge but I'm just doing a quilt.
 Found this quick design "Crazy Nine Patch" .... love it because it's a quick, strip piecing type project.
My PFAFF was smoking through the 12 blocks.


 Each block finished at 19 inches..... I know that's a weird measurement but remember who you are dealing with...... LOL
Block sewn together.... looking pretty good to me

For some reason I decided to do piano keys... OMG, it's taking longer to make those than the whole quilt.... LOL
Please note: I used only fabrics from my stash!!

Mar 24, 2012

So, I'm Thinking......

I've slept on it and come up with this.
 Twenty-five 4 1/2 inch squares of tone-on-tone. 
 Four varied shades of blue prints - I used my grandmother's fan template to cut the shapes.
This view is just to see if I like what's going on.  I think I do so I'll be working on sewing everything down.

Feb 16, 2012

Thought About Adding .......

I've thought about adding a border of Fractured Diamond blocks to my Texas center block. Remember this one. It's been awhile since I've worked on it. Actually, it was stashed under several other projects and I just ran across it purely by accident.... anyone else been down that road before???

  You may remember these two quilts and the templates that I made from pieces of cardboard.
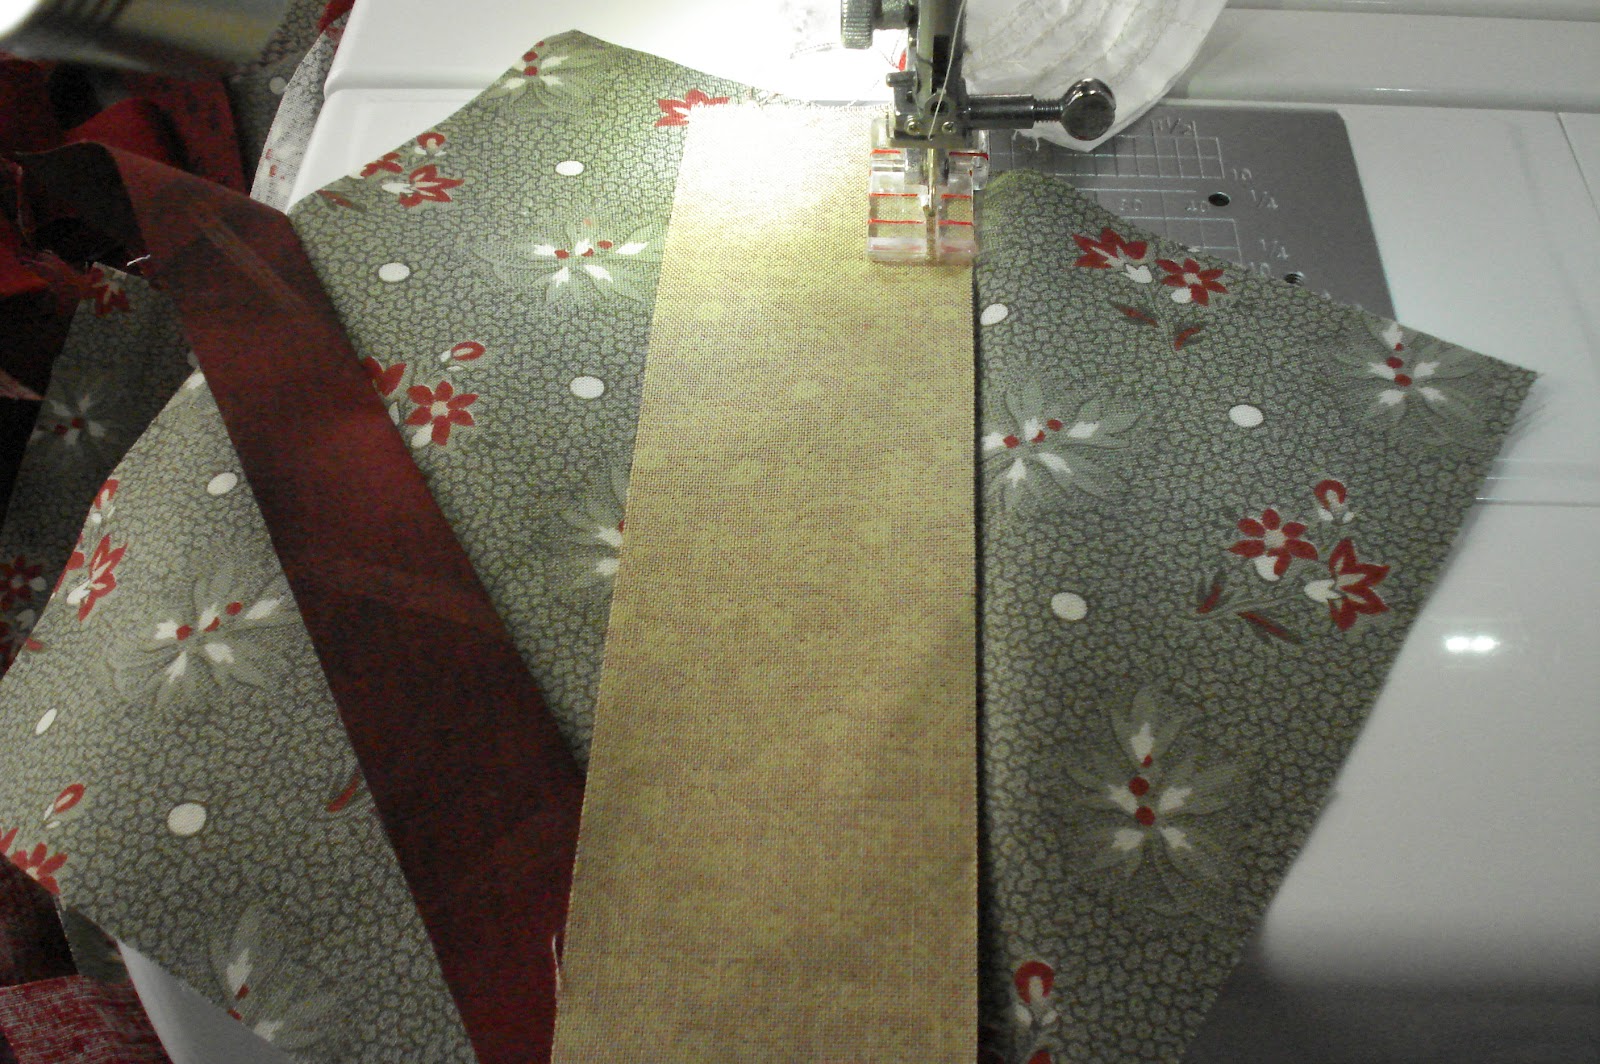
In the above photo each block's  first two sewn strips are of the red color tones giving the effect of an outline around the green inner diamond shape. This makes for a more dramatic quilt.
It's easy to draw your own template. Choose the size square you want. For example this is a 12 1/2 inch square.
Next, decide how much (wide) you want of  your foundation fabric to show. The illustration below shows a 5 inch gap but you can decide how wide you want your "kite" shape to be.

Notice in the bottom corner of the illustration above there is a tiny square. That is the 1/4 inch square that relieves the sewing area..... hope that made sense. 
This is what the template looks like no matter what size square you choose. The shape of a "kite."
 Place your template ("kite") on top of your chosen foundation fabric as shown.
 Press the sided over the template.
Once that's done remove the template. Now you have pressed marks to follow when sewing on your first two strips. If you are uncomfortable with this method, you can draw the marks on using a pencil or removable ink pen.
 Sew the first strip using the press mark.... do not press open yet.
 Only after you've sewn the second opposite strip over the mark, do you press.
You can chain sew the blocks which is a wonderful way to see results as you go along.

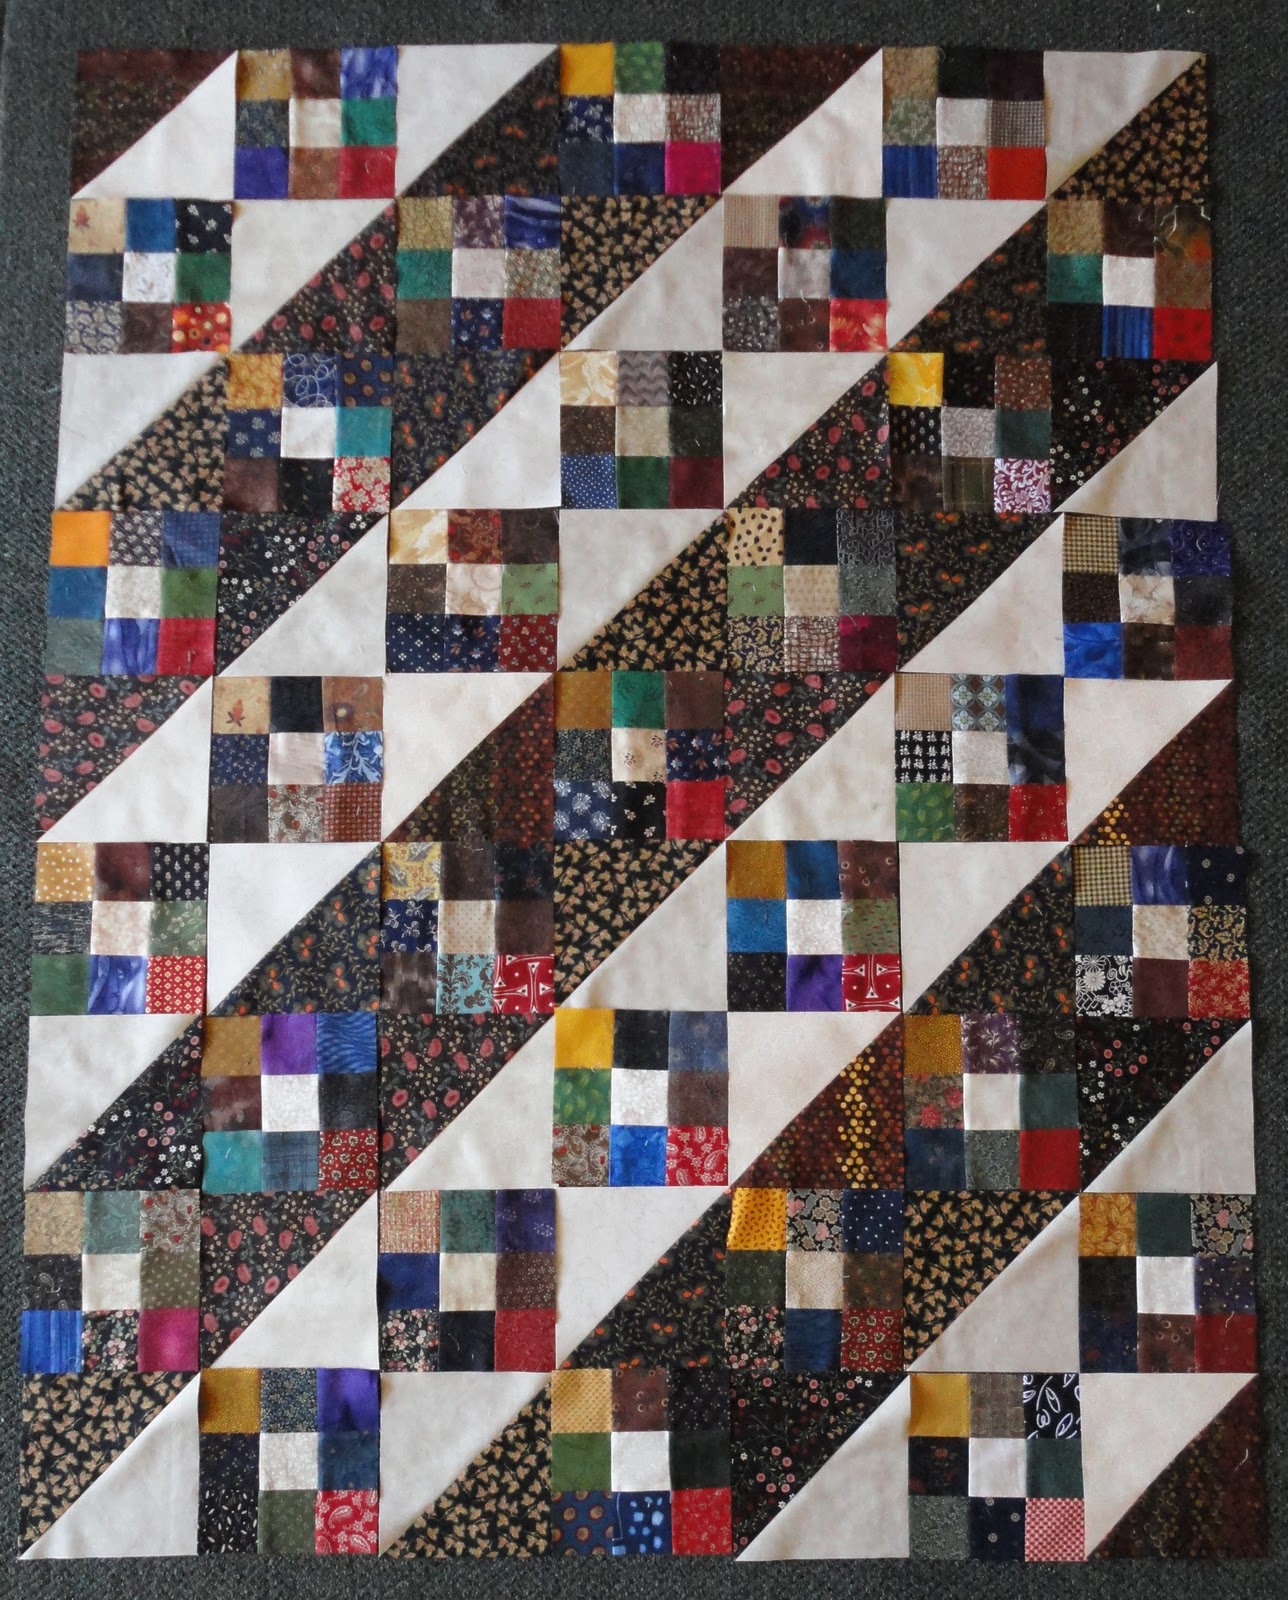
Here, you can see the beginnings of the secondary design.
If you're going for an old fashion look, use muslin or a tone-on-tone type fabric as the foundation.
Note: The smaller the blocks, the more design possibilities.

I decided on "half" blocks of Fractured Diamonds which means to sew one half of each block but be careful if you choose to make these types of blocks because they are sewn in the left and right direction. I used 3 1/2 inch gray squares and varied strips of fabric in tones of browns, red and black. Black was my beginning strip and red the last.
My "kite" was 1 1/2 inches wide by 3 1/2 inches long.
I'm using the photo below to illustrate and remind you of the shape of the kite.

I like the way the border looks... so it's onto the next round.
Any thoughts?????

Nov 6, 2011

Mockingbird

 This is the next block that will go along with my Texas seal.  It's my version of a Mockingbird.  I made four log cabins using 1 1/2" strips and 2 1/2" strips. This gives the log cabins that rounded look you see in the photo.  All fabrics are from my stash which I'm determined to use as much as possible.

Oct 13, 2011

Sewing School

Months ago I posted about my late Great Aunt and her wonderful collections of sewing books and quilts.
One book that I am really fond of is "Hand Sewing Lessons." The book has many great lessons about hand sewing but it also contains a treasure, Great Aunt's personal notes.  Just viewing them brings tears to my eyes and makes me feel even closer to her even in death.
Below is one page from the book. I hope you can enlarge it to read what's on the page.

Sep 29, 2011

BOMs

OMG, it's almost October. I can't believe how quickly this month is rolling by.
Here are the two blocks of the month projects for everyone.
Lazy Hearts and When Nature Calls..... enjoy!


Sep 25, 2011

Stash Bustin' Time - Part 2

 This is the design that inspired me. This one calls for blue and  tone-on-tone half square triangles but I had something else in mind.
Here's what I have so far. I like the layout and plan on sewing it together ASAP.
(each block measures 6 1/2")
 I'll be auditioning border fabric early this week...... one of those "know it when I see it" borders.... LOL

;-}

Don't count the days, make the days count!

Hands2Help

H2H 2013 logo

LinkWithin

Related Posts with Thumbnails

Hop