Ravelly Followers

Reminder

If you are a "non-responder or OpenID-er" which to me means I have no way of responding to a comment that you've left, please leave a way for me to get in touch with you, especially if you're participating in a blog give-away or if you are asking for information or links.
By leaving your email within your comment, I can find you. I realize that this is sometimes a scary thing to do with scams and all but if you disguise the email as say.....
me at yahoo dot com
this is the perfect way to hide from the unwanted eye. So please help me out if you are one of the non-responders.
Thank you, in advance.....Ravelly Rhonda!!
Showing posts with label Scraps. Show all posts

Jan 7, 2019

I've Made It Complicated String

I mentioned yesterday that I'm using Bea Ogesby's book on birds and Flowers. Well things have gotten a bit complicated.  Mr. Cowboy walked by, took a look and said, "The birds look naked!"
Sometimes I could just box his ears but I knew he was right.....SIGH!!!!!!!!  And I had made tentative plans to do just that.
So back to the drawing board. I decided to add a few branches and leaves.

I'll do some hand embroidery on this one which is the Northern Cardinal.


On the Cedar Waxwing, I've added a winding branch and leaves. I may add some berries but at this point I really need to pull back and not over do things.
What are your thoughts on the matter????
Have I bitten off more than I want to chew.....LOL!?

Dec 14, 2018

Fly Like A Eagle

Here's my latest addition. At this time, I'm going to step away from my blog to celebrate the rest of the year with family and friends.

Here's one of the latest little people. Look at those cheeks. Believe you me, I pinched & kissed him until he cried enough!!
I hope everyone has a wonderful Christmas, if you celebrate it, and a fantastic rest of December!! I'll see y'all in the new year!!

Dec 2, 2018

Another Tangent


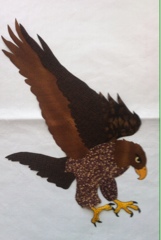
As you've by now guessed, I love eagles and any chance I get, I love to play around with fabric making my interpretation of their majestic bodies. So I'll be making a small-ish quilt (45" to 60") from these beauties. I need to make a few more before deciding on placement but I'm sure Mr. Cowboy will need help with the feeding and such before I can get to do much more at this point. BTW, all the eagles, so far come from my scraps of fabric which seems to be growing instead to disappearing.....huummmmmm!!
 
Many thanks to the bloggers who responded to "One Of My Favorite Things.....NOT!! It was about binding quilts.
  • Joyce commented that she doesn't like the cutting process of quilting.
  • Mary commented that she didn't like the cutting when dealing with garment sewing.
  • Barb doesn't like to stitch the one line of pieces one after the other.
  • And Gene doesn't care for binding either.
Then there was my post about the Word Cloud or Old Dog New Trick. Thanks to Mary, Gene and Magpie for your warm comments. I am looking forward to doing more "word cloud" in the near future.


Nov 12, 2018

Finished The Top


Sorry about the angles & the strange coloration. My error I'm sure. Anyway, I was on a roll this morning & just couldn't stop. This is a surprise for a veteran so I really need to finish it.
Now to get it quilted.

Apr 30, 2018

Mini Tutorial

Several of my blogger friends have expressed an interest as to how I go about making my minis. So I've decided to attempt to explain in a sort of step by step process.
BTW, this post is loaded with photos.
First, I like to either look thru photos that I've taken in the past or look at some of the clipart photos on the subject I'm interested in from the Internet.
Today I decided to do a sunrise or sunset scene. So I'll need to choose from several photos.
This photo has subtle colors and appears a bit foggy.
This photo could be a sunset on the plains.
I really like this photo and will probably to it another time.
This one I thought reminded me of one that one of my blogging friends mentioned that she was interested in making.
All these photos are from the Internet and they all are fascinating to me because of all the possibilities such as.....I'm seeing a mixture of fabrics I'd want to use. I love mixing batiks, solids, prints, florals, etc. 
I'll probably save the ones I don't choose at this time.
I like I'll work with the first photo. 
Now that I've chosen a photo to work with, I'll need to print out a copy.


With the chosen photo traced on the back, I'm thinking that I want to enlarge it a bit so off to the new printer (LOL) to get that done.  Note: The traced photo is in reverse. 

Now I've enlarged it 125% which means it's about 7 1/2" by 9" at this point.

Next I chose some fabrics to use. Sorry about the photo. The one in the very middle is a McKenna Ryan gradient fabric (love it) and the others are an assortment of batiks and some that read as solids.....which are gray, pale yellows and greens, a dark brown and I might choose other fabrics later.  I looked carefully at the photo I chose to get color ideas but it's easy to change or decide on another color scheme.
You see, it's not so hard to do this. I know you can too!!
Now, it's time to trace the design onto the Heat-n-Bond. This is where things get tricky because the parts need to be traced in pieces, such as the tree bark then the tree foliage, next.......  I'll demo to show how that's done.

I'm showing the chosen photo again, hopefully in a better light to finalize my color choices and to be able to compare the photo to me project as I go along.

I've numbered the sections that I'll be tracing just to keep up with every part.

I've chosen the McKenna Ryan piece as my foundation and background. Usually I'd us a muslin as a foundation then all my fabric choices on top but the Ryan piece has just the right colors that I'm looking for even though they don't quite match the actual photo. Remember, it's your project, so if you want to change colors or add something......that's the fun of it all.

Here I've traced off the different parts onto the Heat-n-Bond. Notice that the parts are separate and a bit larger that the actual pieces. This is for adjustments because more is better than not enough. So always give yourself more traced area because you can cut something down easily.

In this photo I wanted to show the difference in the right side and wrong side of the fabric, not because you don't know the difference but because sometimes the wrong side of the fabric is a better fit for what you are looking for than the right side.  Someone once told me, "Remember, we've paid for both sides."
All parts are not pressed to the wrong side of the fabrics I've chosen.

Now I've cut all my pieces out and laid them on the McKenna piece so that you can better see them.

Here you can see the non-stick pressing sheet that I use so that the Heat-n-Bond doesn't gum up my ironing board.

I'm now building from the ground up.

I really like the sun fabric I chose.
Here you see the whole thing before I press everything down.

Also, I like to compare the original to what I've done.


Here are all three. I'll probably do a bit of crayon work around the sun....YES, I said crayons. They are great to add some detail and depth. Just press using a sheet of paper or muslin between the project and your iron.
I hope this helps those of you who are interested in this type of thing. Please leave a comment if you care to. I love hearing from you.




Dec 4, 2017

Commission

A girlfriend saw some of the Veterans quilts I made last month & really wanted an eagle quilt for her daughter who teaches at one of our local schools. So I got to work. Sorry I don't have photos from this particular project. 
I'm quilting it on my Janome because it's not that big. I think she will like it.

Nov 27, 2017

Elephant Fascination

Can you see the sections I've outlined that will make up my version of the elephant?

Here it is from the back. This is the side I'll be tracing from.

Here I have placed the head, trunk and ears on top of my paper pattern to see if I like what's going on.

Sorry, I got so excited that I forgot to take more photos of the process. He's all done but now is the really hard part.
Auditioning background fabrics!!!
Did mention, auditioning background fabrics!!!
I'll be doing this for quite some time.....sigh.
I'll also need to do a bit more work on the elephant...more highlighting or something.
Stay tuned.


Oct 30, 2017

My Fascination With Elephants

I found this particular photo on Google. It represents a collage of images I have in my head of the magnificent mammal, the elephant.
I remember the first time I saw one up close. It was at the Austin Zoo, oh several, well ages ago. Ok, 19......59ish. Anyway, the next time was years later at a circus.
I know you all remember that I don't like things that fly, flutter, crawl, creep, slither, buzz, bigger than or smaller than me....not to worry. The elephant will never get anywhere near me except on fabric!!!! Whew.
I've had an idea for a mini quilt using the fabrics below:
Notice the dark tapestry like fabric down one side of all the others? Well, that piece has been in my stash for a very long time, as in 10 years....sigh. I'm using it in this project, finally. Mr. Cowboy thinks I'm nuts because it's so different from all the other chosen fabrics. 
Just you wait and see how I use it. 
Stay tuned.

Oct 17, 2017

And I'm Back To The Minis

So, I've had this guy in mind since before I lost my mojo. Then when I got my mojo back, I was off on another tangent but I had already pulled several fabrics that could possibly fit.
Using my favorite fabric adhesive and the chosen fabrics, I set to work pressing, cutting and sorting each piece.
I use a non-stick pressing sheet to arrange things.
The rabbit has come together very well.
Here is where I went off the deep end. I have some great brick fabric that I wanted to use and a neat sky piece.
I placed the rabbit atop the background to see if I like what was going on. So far so good.
I took great pains to make the pocket watch. I used a fine tip permanent marker. I'll add the chain to the watch when I quilt the piece.
As I stood back things looks really good but it needed something else. The sky area was missing a little something.
I've added a tree trunk and might add a few leaves but not sure at this point.
It measures 12 1/2 by 17 1/4 inches.


;-}

Don't count the days, make the days count!

Hands2Help

H2H 2013 logo

LinkWithin

Related Posts with Thumbnails

Hop