
Here I go again. Hi everyone. Please allow me to practice on you all with my first attempt to video one of my latest junk journals. I am not good with the direction of turning the journal the correct way. Please use kind words with your critiques. And thanks in advance.

Sunrise at Ravelly's
Showing posts with label Critique Me. Show all posts
Showing posts with label Critique Me. Show all posts
Mar 15, 2024
Jan 7, 2019
I've Made It Complicated String
I mentioned yesterday that I'm using Bea Ogesby's book on birds and Flowers. Well things have gotten a bit complicated. Mr. Cowboy walked by, took a look and said, "The birds look naked!"

Sometimes I could just box his ears but I knew he was right.....SIGH!!!!!!!! And I had made tentative plans to do just that.

So back to the drawing board. I decided to add a few branches and leaves.

I'll do some hand embroidery on this one which is the Northern Cardinal.

On the Cedar Waxwing, I've added a winding branch and leaves. I may add some berries but at this point I really need to pull back and not over do things.
What are your thoughts on the matter????
Have I bitten off more than I want to chew.....LOL!?
Oct 28, 2015
Mini Wednesday
"A Storm Brewing"
is this week's mini but I'm not sure I like this one.


is this week's mini but I'm not sure I like this one.
A buffalo is suppose to be grazing on the prairie with a stormy sky as the main event in the background.
The sky is suppose to look turbulent but I don't know if I've pulled it off. Mr. Cowboy says that I need more blues and grays. I started with a McKenna Ryan background that goes from a dark to light pinkish tan.
I've added a dark green line to show a bit of the foreground when the buffalo is to stand and so grass. (This is only a placement....no pressing yet.)
I got sick of mess with it and pressed it all down but I'm thinking of starting over.
Help!! What are your thoughts??Jun 4, 2013
Remedy
I took a page from someone whom I really want to give credit to. She is a very talented person. Her blog handle is Scooquilt. I hope you will take a moment to pop over to see what she's up to.
My dilemma with the blue mountain fabric was really getting to me. No matter how many other fabrics I auditioned, none of them worked but the blue fabric was too bright/strong. Several of my blogging friends gave me some great suggestions. I remember one from a few weeks ago when I was participating in a "hope" challenge. Anyway, she used Clorox diluted in water to spritz across a project to get it a beam of light affect which I found exciting, unique and fabulous. But rather than spritzing, I went for dunking the scrap in a 100% solution of Clorox and then rinsing. It worked! At least to my liking.


My dilemma with the blue mountain fabric was really getting to me. No matter how many other fabrics I auditioned, none of them worked but the blue fabric was too bright/strong. Several of my blogging friends gave me some great suggestions. I remember one from a few weeks ago when I was participating in a "hope" challenge. Anyway, she used Clorox diluted in water to spritz across a project to get it a beam of light affect which I found exciting, unique and fabulous. But rather than spritzing, I went for dunking the scrap in a 100% solution of Clorox and then rinsing. It worked! At least to my liking.

Before

After....love it!!

It looks much softer and I am loving it. Now just one more block to finish. Can you see it? The one right beside the red barn. It's an empty block that I have to do something with and then I am done....no really!!
Thanks to everyone for your fantastic suggestions. I really appreciate your help.
Hope everyone is enjoying the wonderful Tuesday!!
Jun 3, 2013
DWM
It's Design Wall Monday and I want to thank Judy at Patch Work Times for hosting the great every Monday show and tell. Make sure you all pop over to see others have been working on.
Hooray! I was able to get some sewing/designing in this weekend. I worked on my barn blocks. Would you believe it's taking me longer to do the "filler" blocks than it did to make the initial barns. Here's what I have so far. In no way am I finished but I happy with it so far.


Hooray! I was able to get some sewing/designing in this weekend. I worked on my barn blocks. Would you believe it's taking me longer to do the "filler" blocks than it did to make the initial barns. Here's what I have so far. In no way am I finished but I happy with it so far.
First looks.......

I'm having trouble with depth perception in a couple of the blocks but I'll figure something out.
I did make a couple more barns because I just couldn't help myself and the odd number appealed to me.
Second looks........

Standing back looking at it from a distance............I know that the blue fabric in the last block (mountains) will need to be another color.......I thinking a graduated brown/rusk/beige...........what are your thoughts??

This is what that last block looks like without the mountains.


I did this block to look like a run-down barn in a field or off the side of a road.

The cloud type pinkish gray fabric is actually the backside of this particular fabric which is muted and I think subtle.
Anyway, I'll need to work on these blocks a little more.
Many thanks to Paula, the Quilter who allowed me to use the title of
"All Fenced In" to depict my quilt. Even though not all the blocks have fences, which was what I intended, I really like the name. Thanks, again, Paula!!
I'll think about borders after I figure out depth.....sigh....
So, what do you think??? I'd love to hear from you.
May 28, 2013
Plotting, Auditioning,Bingo!
I've had my barns in the back of my mind for about a month. What to do, what to do??
My first thought was this......


My first thought was this......

But when I stood back, I thought, "Not it!"
On to the next arrangement.......

With this one I was thinking of scattering the barns in more of a
random order but still, "Not feeling it!"
What to do, what to do.......
The filler blocks were too dark so I decided to lighten the fillers.
I had, in the back of my mind, fences in the filler blocks, all along.
BINGO!
So I am off and running with the idea. Sorry about the fuzzy photo below
but I am loving this look and will stick with it.

What are your thoughts?? I'd love to hear from you.
May 26, 2013
DWM-Sunday

I knuckled under and finished piecing the "Green Lover" quilt. A thin 1 1/2 inch red stop border followed by a 6 1/2 inch piano key border did the trick.
Final measurements.....56" by 76" which makes for a wonderful lap sized cozy quilt.
I love the look of this quilt. One day I'll quilt it.
Next up......
Ugly fabric and an idea......

I've had this fabric for years, got it from a girlfriend. I think she said that her grandma had given it to her. As you can see the pinkish coral background and large floral pattern. This is a difficult fabric to work with but you know me.....I looked at it for years until inspiration struck.
Never once did I think to use it as a backing. I was determined not to.

After pulling several dull green fabric strips (green is my favorite color BTW), I decided to frame those strips with a black strip to add interest.

This design is one that I've developed over the years and have shared in the past. It's called Fractured Diamond.
I love the way this particular design works out. You can get a double design or more depending on your particular layout.
After I stood back to take a look, I knew that I wanted to diamond to extend into the border which meant I'd have to do "half" block diamonds with solid corners.
I don't even notice that ugly fabric. All I see is that beautiful green popping out!

Believe it or not, this quilt took only the weekend to sew and that includes interruptions visits from family dinners, Sunday School and Memorial Church service.
The final measurement is 45 inches square.
Love it!!!
Can you see the 4 pointy pinkish stars? The one green 4 point green star diamond? The circular type motion of the outer diamonds??
There are probably more shapes if you squint when viewing the photo.
What are your thoughts??
Sep 1, 2012
Tea Time Teapots - BOM - Block#2
The next block is a cute little teapot that reminds me of the winters with my grandma.
Enjoy this one.

Remember there's a LINK or two on this post and one on my Sidebar.
And I love it when you leave a comment.
It's time for another Give Away. Here's how it works. If you have my Tea Time button on your blog's sidebar and mention that in your comment, it's one chance. If you happen to be a "FOLLOWER" and mention that in the same comment, as well, that two chances.
Remember, this is an honor system give away, so please play fair!!
What's up for grabs, you ask?????
Well, let's see......

 This soft back book is about 45 pages of wonderful and quick projects such as making quick pillows, bags, and table toppers.
Also, included in this give-away are twelve 12 inch squares of some of my favorite fabrics (color green, BTW). Oh, they are so tempting. Take a look...

Enjoy this one.

Remember there's a LINK or two on this post and one on my Sidebar.
And I love it when you leave a comment.
It's time for another Give Away. Here's how it works. If you have my Tea Time button on your blog's sidebar and mention that in your comment, it's one chance. If you happen to be a "FOLLOWER" and mention that in the same comment, as well, that two chances.
Remember, this is an honor system give away, so please play fair!!
What's up for grabs, you ask?????
Well, let's see......
Also, included in this give-away are twelve 12 inch squares of some of my favorite fabrics (color green, BTW). Oh, they are so tempting. Take a look...

Just imagine what you could do with those babies!!!
OMG! I just noticed that this is slightly over my 1000th post. Can you believe it because I sure can't!!!!!
How in the world did I do it....LOL
Good luck, in advance, to those who are participating!!
Aug 2, 2012
Tea Time Teapots - BOM - Block #1
It's finally here!!
Tea Time Teapots BOM

Now for the LINK.
I was so excited with this particular BOM that I made two sets. The teapot above is made from the red scraps I have an abundance of. So the teapots you'll see posted each month are going to have red fabric placement while the BOM design PDF will have both scrappy and red teapots as examples.
This project is a great way to use some of your favorite colors or scrappy works well, too.
Tea Time Teapot block (TTT for short) is also linked on my sidebar, I hope. Sometimes I forget to link there.
I would love your comments as they aid me in the process of writing directions and critiquing everything.
Now, for the first give-away......

Honor system means I probably won't be checking to see if you have grabbed the Tea time button or that you are a "FOLLOWER." Although I do know most of my FOLLOWERS.
Mar 29, 2012
Eagle Update and More


So far so good. I'll have to think about the next round so I'm placing this in my UFO box for a week or so.


What are your thoughts???
Feb 16, 2012
Thought About Adding .......
I've thought about adding a border of Fractured Diamond blocks to my Texas center block. Remember this one. It's been awhile since I've worked on it. Actually, it was stashed under several other projects and I just ran across it purely by accident.... anyone else been down that road before???

You may remember these two quilts and the templates that I made from pieces of cardboard.

You may remember these two quilts and the templates that I made from pieces of cardboard.

In the above photo each block's first two sewn strips are of the red color tones giving the effect of an outline around the green inner diamond shape. This makes for a more dramatic quilt.

It's easy to draw your own template. Choose the size square you want. For example this is a 12 1/2 inch square.
Next, decide how much (wide) you want of your foundation fabric to show. The illustration below shows a 5 inch gap but you can decide how wide you want your "kite" shape to be.


Notice in the bottom corner of the illustration above there is a tiny square. That is the 1/4 inch square that relieves the sewing area..... hope that made sense.

This is what the template looks like no matter what size square you choose. The shape of a "kite."

Place your template ("kite") on top of your chosen foundation fabric as shown.

Press the sided over the template.

Once that's done remove the template. Now you have pressed marks to follow when sewing on your first two strips. If you are uncomfortable with this method, you can draw the marks on using a pencil or removable ink pen.

Sew the first strip using the press mark.... do not press open yet.
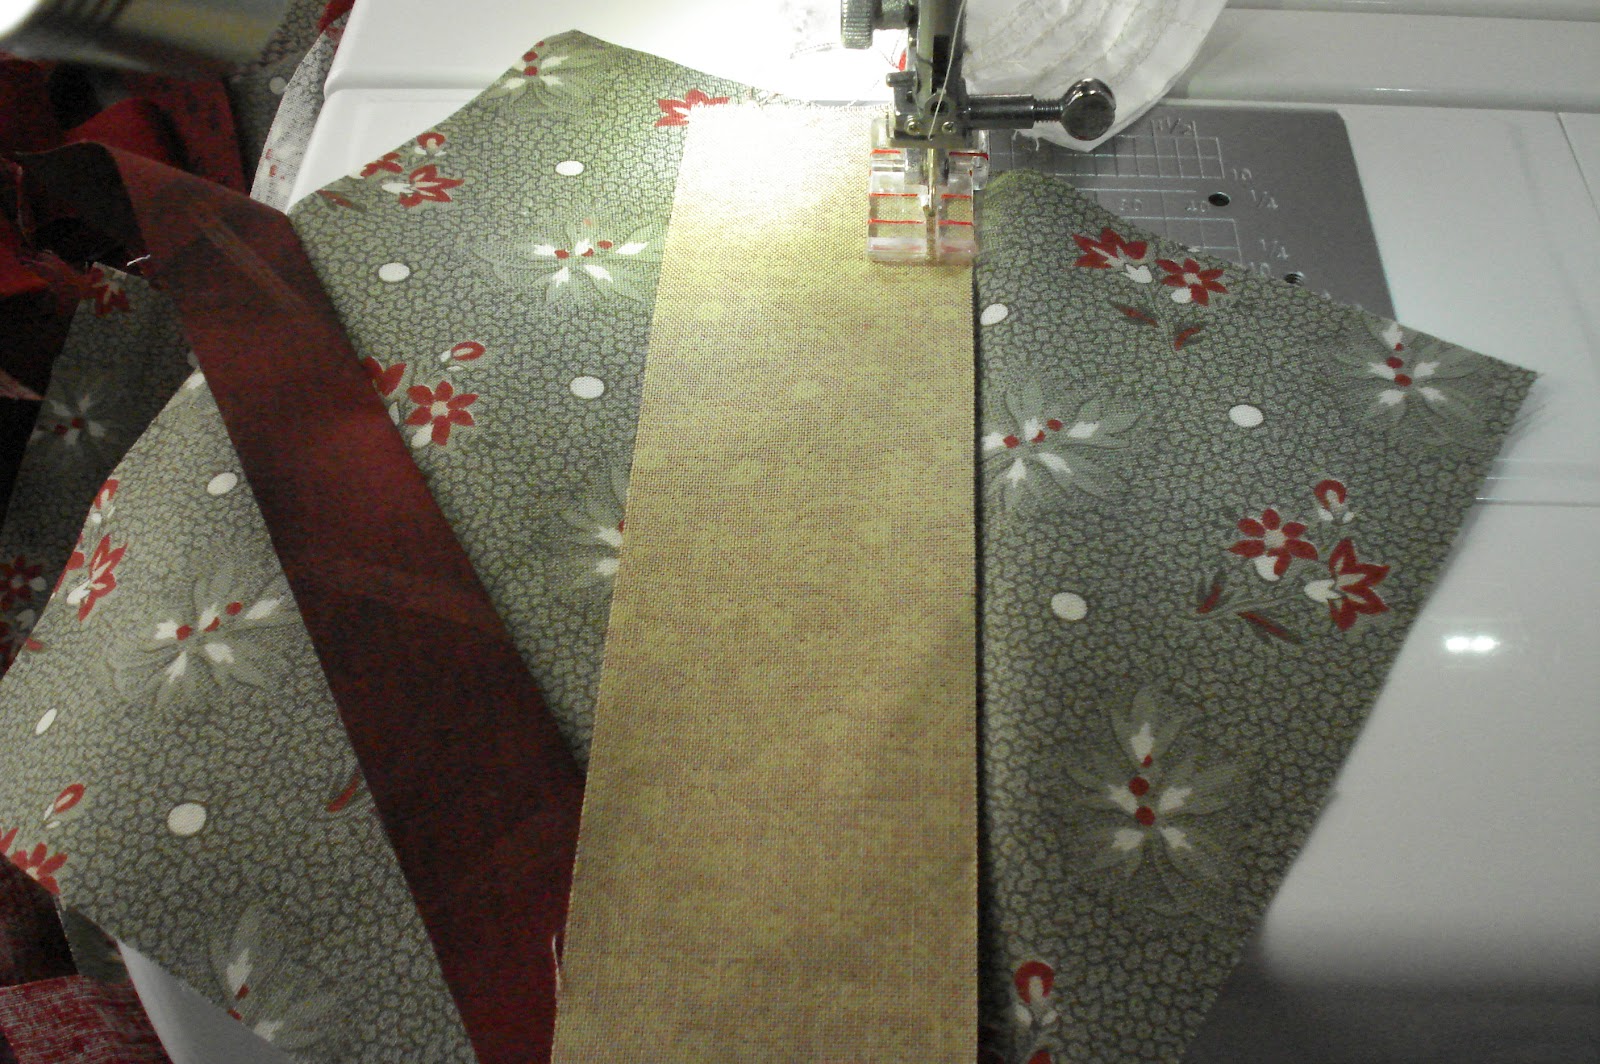
Only after you've sewn the second opposite strip over the mark, do you press.

You can chain sew the blocks which is a wonderful way to see results as you go along.


Here, you can see the beginnings of the secondary design.
If you're going for an old fashion look, use muslin or a tone-on-tone type fabric as the foundation.
Note: The smaller the blocks, the more design possibilities.
 I decided on "half" blocks of Fractured Diamonds which means to sew one half of each block but be careful if you choose to make these types of blocks because they are sewn in the left and right direction. I used 3 1/2 inch gray squares and varied strips of fabric in tones of browns, red and black. Black was my beginning strip and red the last.
My "kite" was 1 1/2 inches wide by 3 1/2 inches long.
I'm using the photo below to illustrate and remind you of the shape of the kite.

I like the way the border looks... so it's onto the next round.
Any thoughts?????

My "kite" was 1 1/2 inches wide by 3 1/2 inches long.
I'm using the photo below to illustrate and remind you of the shape of the kite.

I like the way the border looks... so it's onto the next round.
Any thoughts?????
Subscribe to:
Posts (Atom)
Hands2Help

LinkWithin
