

Happy first day of May everyone!!

Thanks to all who have commented on my previous post on minis. And thank you for reminding me that I didn't follow through with the entire process. The stitch or not to stitch part.

These two minis are not stitched. If you are not going to be washing or using your mini as a mug-rug, there is really not need to stitch it down. You can hand wash it gently, lay flat to dry and then press carefully with no problems.

I do raw edge stitching which I will show at the end of this post. I do the raw edges and also quilt inside and around each piece.

Here's a close up of the eagle's beak and feathers plus stitching around the area.
Here's another example.

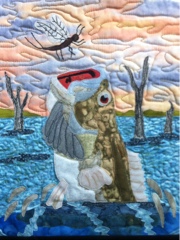
Here' you can see where I stitched around the head of the buffalo, inside the body and around the piece.

Same with the beaver.

Stitching around and inside the areas also adds texture and depth to your project.

Here are three sizes of needles that I use. The smaller the needle, the less fraying of your project because you will be stitching very close to the edge of your pieces.

Here, I hope you can see that I've moved my sewing needle as far over to the left as possible. If you machine doesn't have this capability, you can adjust your project so that the needle will land near the edge.

Here you see I have positioned the area I'm about to stitch. It's hard to say how close to the edge I stitch....probably at eighth inch or less.


5 comments:
Thanks for answering a question I had but didn't ask. I guessed at the answer and was right. Now, another question is "is the quilting in the background free motion". I'm guessing yes. I have not tried that yet.
xx, Carol
Thank you Rhonda,
for answering all my questions. That helps me to try it once. Most interesting, I found that you work with 3 different thin needles. I would never have come to that. So far I only own one needle size. I have saved your contribution and can access it if necessary.
Thank you for giving your knowledge and skills so generously.
Greeting Guilitta
Thanks so much, learned some very useful tips
Thank you for giving further information on how you create your pieces - and thank you as well for sharing your favourite needles. I often use a 12 but don't have any 8's in my stash....will have to try them.
I do like seeing how you do what you do. I've done a little of the straight stitching recently, and I like it, but won't be washing it, either. That face is too wonderful!
Post a Comment