Ravelly Followers

Reminder

If you are a "non-responder or OpenID-er" which to me means I have no way of responding to a comment that you've left, please leave a way for me to get in touch with you, especially if you're participating in a blog give-away or if you are asking for information or links.
By leaving your email within your comment, I can find you. I realize that this is sometimes a scary thing to do with scams and all but if you disguise the email as say.....
me at yahoo dot com
this is the perfect way to hide from the unwanted eye. So please help me out if you are one of the non-responders.
Thank you, in advance.....Ravelly Rhonda!!

Mar 31, 2012

Leafing Through The Year - BOM- Block #4 and Trees From WNC


Enjoy... Link on my sidebar for design.
BTW, pop over to Fiesta's and search her blog to see her interpretation of Leafing Through The Year. She's doing a great digitizing job with the leaf designs.


Next, here's the next Tree installment from When Nature Calls
Trees 3 and 4... also found on my Sidebar.

Mar 29, 2012

Eagle Update and More


I finally got the eagle sewn onto the background. I used one of my fancy stitches for the outer circle. I did a chain hand stitch with black DMC floss and a satin stitch for the inner circle. I love the little black circle between the inner and outer circles, just sets things off.
So far so good. I'll have to think about the next round  so I'm placing this in my UFO box for a week or so.

 This little quilt was made using 3 fabrics of solid blue, solid yellow and a small floral print. I was practicing making half square triangles at the time so this was quick and fun.
This final quilt top is one that I've been working on of a couple of years.... LOL..... I finally settled on the grains of wheat at the top and "Harvest" at the bottom to finish off the look.
What are your thoughts???

Mar 27, 2012

Seeing Red

As you know, I'm trying to reduce my stash in 2012 by sewing up scraps but it seems that the "fabric Gnome" keeps adding to that basket every time I turn around. Anyway, I had a large red scrap, roughly 1 1/2 yards that worked beautifully in this Spinning Star quilt top. I dug down deep in the scrap basket and pulled out several tone-on-tones for the lighter backgrounds and finished off the piece with a hint of black.  It measures 50 inches square and I love the way it turned out. What do you think?

Mar 26, 2012

Mending Fences

This past Saturday I had the wonderful chore, along with a couple of cousins, to repair fences on our property after the recent flash floods we've had.  While participating in that, I caught a little peacefulness before heading off for my second reason of tagging along....... I was also on the lookout of those pesky moma cows and their newborn babies. My job was to get a head count, for some reason known only to my cousins...... personally, I think they just wanted to get rid of me...... just sayin'.  Anyway, the baby critters have a tendency to hide in the oddest places..... like say in an adjourning pasture because the little buggers have rolled under the fence somehow and are now stuck in the neighbor's place.
Did I mention that I don't really like things that are bigger, smaller, faster, buzz, fly, slither, swim, waddle, crawl, flitter....... need I list more!
Ah farm life.... 

Mar 24, 2012

So, I'm Thinking......

I've slept on it and come up with this.
 Twenty-five 4 1/2 inch squares of tone-on-tone. 
 Four varied shades of blue prints - I used my grandmother's fan template to cut the shapes.
This view is just to see if I like what's going on.  I think I do so I'll be working on sewing everything down.

Mar 22, 2012

Two Old Sisters

The title isn't true because this post is about two brothers daughters.
The term "old sister" is something we identify older church going ladies of the church and is an endearment of love and respect.
Last week two of our community's oldest members passed away on the same day. Now, if that isn't enough they were the daughters of two brothers. And if that's not enough, both were over ninety years old.
These ladies were my cousins whom I've been lucky enough to have known all my life. Their wisdom and love will be missed greatly but their memories will live on in every life they touched.

Cousin E, - 96 years old
Teacher and housewife

Cousin C. - 92 years old
Housewife

Mar 21, 2012

Flood Waters

Our little Keechi Creek rose over its banks to flood the road from one community to the next. Boy did we get a lot of rain...... loads of thunder, lightening and wind around 30 mph.
In the words of Mahalia Jackson, an old Spiritual singer, "Didn't It Rain Children, Children Didn't it Rain!"

Mar 20, 2012

Details

 I've gotten the outer brown circle in place and will need to hand stitch a thin circle to add more detail later. So far the circle is roughly 16 inches.
The stars that appear above the eagle's head are supposed to number 13 for the first 13 states but I decided not to depict that tiny detail because my talents are not up to that one as of yet...... LOL
The leaf and berries have the correct number of 13 each and I have 13 arrows.  Not sure of my next step at this point but I'll sleep on it and come up with something soon.
The weather here in central-ish Texas is unusually rainy. Last night we had lots of thunder and very scary lightening. Then the rain came in buckets. It was one of those times like I remember my grandma use to say, "Get somewhere and be still, little girl!" That's what she told me during those time and believe you me, I was very still last night....... smiles!

Mar 19, 2012

Eagle Part 2 - Design Wall Monday


I managed to get the tail feathers, leaves and arrows and talons on. Also the banner and striped shield.  The next step will be getting the circles cut to place the eagle in just the right place.
To see what others are up to pop over to Judy's for Design Wall Monday' sign-up list.

Mar 17, 2012

National Quilting Day

 
To celebrate National Quilting Day, I decided to pick out some fabrics to start a new quilt I've been thinking about.  As most of you know, I'm really into "seals" ..... not the animal or the guy model..... I'm talking about symbols of authority, such as, the Texas seal.... remember that one??


So, this is the next project concerning seals. As I've said many times, for me the process of choosing fabrics is the hardest part because there's just so many colors to choose from and I want to get just the right shades.

When working on this kind of project, I use a color copy and a black/white, plus, I enlarge or shrink the design as desired.
I'll be using several techniques.... applique`, hand embroidery and silk purse, as well.


Here I've started the eagle. It's just on a non-stick pressing sheet for the moment. I'll add the talons later and the white tail feathers.
Happy National Quilting Day everyone!
Mar 14, 2012

Final Step and Done

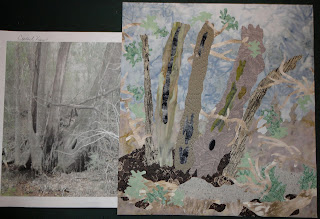
I eked out some time to finish my woodsy project. Now, mind you, this is my take on the photo, which means I can choose to alter the photo to suit what I want to achieve. You know how we quilters are. We see and love a pattern, design or block and sometimes change it to make it ours.

 I think it's important to take photos as you go because it allows you to see what needs to be added or taken away. This way you can evaluate what you're doing with perspective. Sort of like squinting at a block to see you've made a mistake.
The sky fabric I found and added to the backgrounds really helped to define the piece. I also added more shadows around the bottom of the little quilt.
 I then compared the original photo to the piece. I added more branches across the front of the rotted tree trunks and more shrubbery , as well.  I liked what I saw and pressed everything down before I changed my mind. Sometimes I tend to over think a project.... not good..... you can definitely go overboard.
The final piece measures 13 1/2 by 12 1/2 inches but I might trim it more later.  I just love the subtle colors mixed in with the dark shadows.
I have no idea of how I want to quilt it but I'll think of something.
What are your thoughts????

Mar 12, 2012

Step 3

Photo

Shhhhhhh......I can't believe it but I found some time to work on my woodsy project.

  • This is just an audition step. 
  • By cutting and laying out the various fabrics pieces, I can pick and chose what works and what doesn't. I've already pressed the adhesive and cut the pieces..... it's a very small price to lose the fabric I don't choose.
  • I'm thinking at this point that I may need to use a different background... a little darker but still mottled.
  • I've used the reverse side of a black fabric to shadow the hollows n the trees and I really love that effect. Batiks really work great in this type of project.
  • I found some subtle greens for brush in my stash but as I said, I need a different background......
  • Once I've finalized everything, I'll stitch everything down and add the thin limbs and branches shown in the foreground on the photo.

Stay tuned.

Mar 11, 2012

Step 2


Using a light box or light source, I've starting tracing the reverse side of the photo. I know my images are faint but that's alright with me. I used something called Dry Mounting Tissue. A box of it was given to me by a friend years ago and at the time I had no idea what to do with it. But it has really come in handy as an almost transparent product.
On each tissue I traced one component of the photo which will be matched with a fabric later. I used a Sharpie Permanent marker for tracing..... it's the only thing that won't wipe off.
Each traced component will now be traced onto the Steam-a-seam and then pressed to the back of the chosen fabric when I find the time to get to it.  
I'm afraid that life is about to get in the way for a few days so hang in there and stay tuned.

Mar 10, 2012

Fabrics Chosen

In a recent POST, I talked about a new applique project that I'm thinking about from a photo I took.
I don't have a plan when I start these kinds of things. I just know that I love what I see and go from there.

First, I made a reverse copy of the photo... this is for tracing onto the steam-a-seam (my favorite adhesive and no, I'm "not" doing needle turn applique.... LOL). Next, I started pulling fabrics that appealed to me and fabrics that seemed to match the colors in the photo (all from my stash that seems to grow instead of decrease). Black and dark brown are not pictured with the fabrics but I will add those later for shading. I don't know if you can see the background fabric I chose between the two photos at the top but it's a marble grayish batik that is perfect...... love it!!!
That's what I've done so far. The next step will be taking apart the areas I want to work on such as tree trunks, branches and brush.
Stay tuned.

Mar 8, 2012

Pop, Pop, Pop

That's the sound I heard just before I grabbed my camcorder and began filming around 6PM.
Yep, that hail.... pea sized hail but it sounded much bigger and very scary. I thought it would break my windows.

Mar 7, 2012

No Border Yet

I've finished sewing the blocks together but haven't had time to even decide on a border. The blocks started with a base yellow fabric of 12 1/2 inches. The quilt top now measures 72 inches square. I just love the two designs that make up this quilt and I used lots of scraps ...... about 5 yards worth.
This quilt was a very quick one to complete and will go into my stash of quilts to be used one of these days.
 

Look at this wonderful quilt top a friend make using a 1/2 inch black strip between those beautiful batiks.
 Then there's this neat Disappearing Nine Patch quilt blocks. Can you believe that these started out as nine patches???

Finally, these blocks were from the last quilt my friend Jerri worked on before her illness took her. The woman could really put together the fabrics.

Mar 6, 2012


 A few posts ago I talked about my new baby Rowenta.... it's light weight, gets really hot and presses like a dream. I "don't" use the steam part at all and that's fine, too. I love, love, love this iron and recommend it.... but mind you, it's only been 2 1/2 months of bliss.

Meanwhile, I'm back to this fractured diamond block that I just love because you can fiddle with the placement of fabrics and get a whole new look.

I added a red tip to the top of the "kite" area to get the look you see below...... love it!!

Mar 3, 2012

New Project.....Maybe.....Probably

As some of you may have noticed, I love to take photos of nature.
Most of the time a photo will wind up as a "header" on my blog but the photo below will possibly wind up as a small quilt. This dead tree combo is in an area in our back forty. I've passed by it many times but this time
something grabbed my attention and I snapped several shots. It has character and I love the soft background as if mist or fog is framing the area.
So I'm going to study the photo, draw out some ideas, pull out some fabrics and think/ponder some more. Whatever I do, I'll post my progress, so if you're interested in a how-to, feel free to follow along and join in the process with me. Remember, this is a learning experience and I'm learning right along with you.
This project will work for " hand and machine applique`rs," steam-a-seam-ers and any other method that works for you.  And I'm thinking that some of you advanced digitizers with those great machines could scan and digitize this photo into a program to stitch out. Now that would be really cool. I might even try that one. Now I'm really getting excited.
I'm already thinking about the perfect bark fabric..... I'm off to dig it out of my stash!!


Fabric Swatch Give-away Winners

Yes, I said winners.
If you left a comment the other day, you are in luck because there were just a few of you so I've decided to give each person a measured swatch of my beloved textured fabrics. They will be different but you will love them.
Do a little dance cause fabric will soon be on it's way..... to you!!!

So Winona, Sandra, Barb and Margie send me your mailing addresses and you'll get a wonderful surprise very soon!

;-}

Don't count the days, make the days count!

Hands2Help

H2H 2013 logo

LinkWithin

Related Posts with Thumbnails

Hop