Ravelly Followers

Reminder

If you are a "non-responder or OpenID-er" which to me means I have no way of responding to a comment that you've left, please leave a way for me to get in touch with you, especially if you're participating in a blog give-away or if you are asking for information or links.
By leaving your email within your comment, I can find you. I realize that this is sometimes a scary thing to do with scams and all but if you disguise the email as say.....
me at yahoo dot com
this is the perfect way to hide from the unwanted eye. So please help me out if you are one of the non-responders.
Thank you, in advance.....Ravelly Rhonda!!

Aug 31, 2010

Washers

Not what you were thinking, uh!
These little bobbin washer could make a big difference in your sewing, quilting and machine embroidery life.
My girlfriend, Annie (no blog) introduced them to our group a few months ago when we were all complaining about the bobbin threads always slipping or knotting up.  Annie whipped out a package of washers and handed them out and said, "Just try it....you'll like it."  She was so right. I, for one couldn't believe the difference that little reinforcement hole made...remember those from elementary school.....LOL.....
These washers are make from some sort of plastic so they last a long time. The ones I purchased were designed by Sharon Schamber, author, teacher and master quilter.
If you've had trouble with your bobbin and can't seem to find a solution, you might try the washers.
Aug 30, 2010

Thread Stands - Where Do You Stand?


This past weekend, our "wacky" 6-Pac group met at the Deer Camp for some well deserved girl and sewing time.  One of our many discussion was about which stands we prefer using when machine embroidering and which threads we use or don't care for (for another post).  Above are several pics of stands.  The first one is a single stand which I've used many times in my sewing and embroidery ventures. It works well with threads that need to relax a bit before going through the needle.........usually these are threads that are twisted (metallic threads are one example) so the longer it takes to get to the needle, the better.
The next 3 stands are great for machine embroidery projects where you have many thread changes.  They make it easier to place the needed threads within easy reach, placement order, and quick threading which speeds up the embroidery process.
Note the last stand in the above photo. It has a place to store hoops. This particular stand is probably used mainly for thread and hoop storage but as we all know, quilters are very resourceful and can adapt just about anything.
What are your thought on the matter of thread stands? Even if you don't do machine embroidery, having an extra stand can come in handy. I'd love to hear from you.

Aug 26, 2010

Check List


I'm sure that those of us that go on regular retreats will know what I'm talking about as you read this post.
My "wacky" sisters of the heart and I go on retreats fairly often (at "deer camp"....one of our most favorite places to me & the occasional far away retreat), so I have learned to have what I call my "keep packed" bag ready.  I have in it me bath towels, soaps, shampoo, make-up, night-wear, favorite pillow, quilt for the bed, comfy shoes and snacks.  That's the easy part. 
Next comes the stuff that I "need" and can't pack until the day before......my quilting chair, assortment of fabrics, my 5 drawer thread/scissor/tape measure/other tools I might need drawer, rulers, iron, small cutting mat, did mention assortment of fabrics, extra tables....a small one and a 4 ft one, the clothing I'm going to wear for a few days, an assortment of fabrics and the last minute things that I can cram into those tiny air pockets in the car.
Does this sound familiar to anyone else?????  If it does or not, I'd love to hear what you pack for retreats.
Oh, BTW, I'll going on retreat for a few days, so it you don't hear from me.......don't worry....I'll have plenty to show and tell on Monday.


Exhibit "A"
Hey, I see a couple of more inches in the back...LOL

Aug 24, 2010

State Fair of Texas

Here I am delivering my "Patriotic Me" quilt to our state's fair.  I've been to the state fair many times and always marveled at the beautiful quilts on display.  While surfing the net the other week, I ran across an article on participating in the fair's many events (cooking, canning, wood work, quilting, etc.). I decided to give it a try.  This is a juried event and ribbons are involved.  Wish me luck.

Aug 23, 2010

My First Tote Finale

All done with my first tote!   All fabrics, threads and stabilizer came from my stash.  I'm so proud that I didn't run out to buy more fabric......you know how much I love to shop for fabric........but this time I stuck to only my stuff.  Note the "Grocery Diva" embroidered lettering....I was so glad that it came out centered.....LOL 
Now, I ready to shop for groceries.

Aug 21, 2010

My First Tote

Here's a sneak peek of my first tote ever.  I know, you're asking yourself why I haven't made a tote before and to tell you the truth, I just hadn't gotten around to even attempting this kind of project.  I am not a seamstress, as I often tell my mother (long story...not for this post).   I'm using a gray heavy cotton fabric for the outer part of the tote.  Since I'll be taking this tote with me when I grocery shop, I'm appliqueing colorful fruit on the front and maybe on the back.....(hadn't gotten that far yet).  Of course I'm using my favorite technique....Steam-a-Seam everything then stitch around the edges. It fast and easy.


For the inside, I've chosen a fabric that I bought in a weak moment.....I might have been blink at the time.....(what was I thinking????)......This was way back when I was into Stack and Whack..........BTW, that's where our group name originated from that little one day retreat.  We were so whacked out after that the name "WackyPac Quilters" just stuck.  These toucans are so cute but never went with any of my usual fabrics.  Trust me, the fabric is even uglier in person but after looking at it awhile, it grows on you.......NOT!  Hopefully, I'll have this ready for my next trip to town. 

Aug 19, 2010

Thread Winner

I didn't forget.
Many thanks to those who shared their methods of saving the end of the spool threads....
This great spool of thread goes to...............
...........................................
.........................
................
.......
..
The Quilting Pirate
Congratulations!
"E" me your address and it's on
the way!

Aug 17, 2010

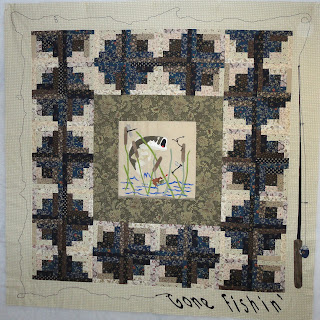
Gone Fishin'

I really want to thank everyone who left great comments on this project, Sawing Logs.
I did go ahead and make 16 more log blocks because I had another idea in mind by that time.


I decided to add a 6 1/2" cream toned border because I knew I wanted to add a fishing reel but really had no clue of what to do after that. So I slept on that idea......dreams of piers, catfish, turtles, snakes......this turned into a nightmare.........time to wake up!!!!!  By morning I figures I needed the fishing line.


I wanted the line to unravel around the border....this is the way I remember my brother and I going fishing, getting the lines tangled, laughing as we tried, unsuccessfully to untangle them, cutting the lines only to restring them.

By the time I got to the bottom corner of the border, I knew I needed a hook and just happened to think of hooking the "Gone Fishin' " on said hook.  If you remember this all started from the center block that was sitting in my UFO box.  Don't be afraid to experiment with different methods or techniques.  You'd be surprised what could happen.
 The final measurement is 58" by 58" and I'm so happy with the outcome.

Aug 16, 2010

Threads Idea Snippets


The other day I posted about what I do with the thread at the end of the spools.  I asked what my blogger buddies did with theirs end of spools. I received some great answers that I wanted to share with everyone.  If anyone else has ideas not mentioned below, please leave me a comment on what you do.  You do not have to be a quilter to comment and all comments are welcomed.  Snippets

Barb said that she uses the threads when chain sewing as I do.

The Quilting Pirate said that she tends to wind the threads onto bobbins and puts them with her applique hand working bobbin holder.

Fiesta said that she is using the threads to stitch her hex blocks.

Gene said that he put the spools aside for hand sewing.

JustCindy is using the threads for basting her projects such as the hex blocks she's working on.

Haupi is new to quilting and is excited to read all the suggestions.

Needled Mom had tip that I'd never thought about before. she collects the threads and sandwiches them between some Dpioni silk and tulle fabric. She then free motions the pieces, cuts them into flower shapes, adds some yarn and beading to the center, adds a pin to the back and uses them to embellish clothing.

Joanne said that she uses her end of spool threads in her bobbins because it's easier to change them out than to thread her machine. Joanne is a long arm machine quilter. Make sure you check out her blog.

Aug 14, 2010

At The End of My Threads!

I know that all of us quilters have had these problems......you're winding lots of bobbins from a spool of thread but can't finish off the spool....what do you do with that little extra?
You're sewing along on an embroidery project and your spool of thread gets dangerously low, so you change to a fresh spool....what do you do with that little extra?
Here's what I do.....I place the little....to nearly nothing spools into a zip-loc bag so that when I'm working on chain sewing and don't care about what color I'm using, these end of the spools come in very handy. With the economy as it is now, every little bit of savings is welcome.
What do you do with your low spools? Leave a comment stating what you do. I'll do a random number drawing and one lucky commenter will win the following........ 

This is obviously Floriani Embroidery thread   PF1085 - LOT:724316 - 1000M

Aug 13, 2010

Sawing Logs

Did I say sawing, I meant sewing logs!

Some of you might remember the center of this quilt. It's a spin-off of the one I entered in our state's Ag department block contest. I added the frog and a second dragonfly.  Anyway, these types of blocks usually wind up in my UFO box but I decided to use this one along with the log cabin blocks I've been working on. 
In this next photo, I've sewn on another top and bottom rows.  If I add another 16 blocks, the quilt will be square again. It measures roughly 36 1/2" by 48 1/2".  My question is.....should I stop with this size or add the 16 side blocks???
Here's a sneak peek of what it could look like....but do not allow this to influence your opinion.

Aug 12, 2010

What a Morning!

This morning I woke up to these two critters......the red-tail hawk in my front yard and the fawn in my back yard.  Hopefully the hawk was after a snake. The fawn's mom leaves her in my yard every morning while she goes off to feed. The baby got up to chase after a mourning dove. It was quite a site, the dove was very upset that the fawn interrupted his feeding time under the bird feeder.

Aug 9, 2010

Log Cabin Quick Mini-Tutorial

Choosing fabric is probably the hardest step when making log cabin blocks. Most log cabins consists of a light side and a dark side. The center block is traditionally red or yellow signifying a chimney.  For the project I'm doing, I've chosen not to use the red or yellow colors. So the majority of my log cabin will be dark colors on the one side.

I've cut 1 1/2 inch strips from all of the chosen fabrics and now I've placed my center fabric on the
bottom and the first dark fabric on top, right sides together then stitch.

I've stitched two strips, as shown. Next comes the cutting apart.

Using a rotary cutter and ruler of your choice, cut 1 1/2 inch segments before ironing them open. It's much easier this way.
The first 2 fabrics have been pressed. I like to press the seam away from the center fabric.
I've now chosen the next dark fabric and am chain stitching the pressed fabrics to it.
At this point with the 2 dark fabrics sewn to the center fabric, the log cabin is roughly square.

Added the first light round.

Adding the second light round. Each round is change stitched to save time.

Note how after each completed (2 lights) section, the log cabin is roughly square.  You may square up as you go but it's just as well to square up after making all the block.

This arrangement has 16 blocks and is called "Barn Raising."  I'm going to make more blocks and I've got a surprise to show in a later post so stay tuned.

Aug 7, 2010

This or That


So, I finally found time to sew on the 1 1/2 inch black border.  Now it's onto the final border. I'm auditioning 2 fabrics so far. What do you think?  This or that or maybe something else.

Aug 6, 2010

Nesting Robin Round 2 & Embroidery


Here's my second portion for the Stay at home Round Robin. The block had to measure 4 by 6 inches sewn on the left side of the center block.
Remember, it you'd like to participate, pop over to Kate's blog for the rules and instructions.  Look under SAH Robin at the top of her blog.

I've also been working on filler blocks to go with the hearts I stitched out at the embroidery retreat.  I'm going with Log Cabin blocks so far but if that doesn't workout, I'll still be able to make a quilt from them.

Aug 5, 2010

Digitizing Fun

This is my second attempt at digitizing......well actually my Janome did all the work.  I traced off this Mad Hatter onto a sheet of paper, scanned it and saved it as JPEG, GIF, etc. sort of thingy and uploaded the picture to my digitizing software and clicked to digitize.  A few nail-biting seconds later I downloaded the image onto my machine and stitched it out.  It's crazy cool!
I see some spots where I traced heavily....not good for I'm fairly happy with it.  What do you think? 

Aug 4, 2010

The Many Do's of Little Princess


Little Princess has a hair problem that has persisted since birth.....her mommy and I were teasing her about it.  I'm taking and keeping all the pics so that when she grows up and starts dating.....I'll have all the wonderful pictures to share with her boyfriend......hehehehehehe......just kidding......I think!
They grow up so quickly.

;-}

Don't count the days, make the days count!

Hands2Help

H2H 2013 logo

LinkWithin

Related Posts with Thumbnails

Hop