Ravelly Followers

Reminder

If you are a "non-responder or OpenID-er" which to me means I have no way of responding to a comment that you've left, please leave a way for me to get in touch with you, especially if you're participating in a blog give-away or if you are asking for information or links.
By leaving your email within your comment, I can find you. I realize that this is sometimes a scary thing to do with scams and all but if you disguise the email as say.....
me at yahoo dot com
this is the perfect way to hide from the unwanted eye. So please help me out if you are one of the non-responders.
Thank you, in advance.....Ravelly Rhonda!!

May 29, 2010

Just In Time for the 4th Part 2


By now, you have chosen a picture and have had it enlarged, if necessary.  The next step is to number your picture into workable sections as shown above.

Here you can clearly see a close up of a particular section. I wanted to emphasize the fact that even though the wing is continual, you can break it into even more sections to lend more possibilities for fabric usage.  Note that the eagle now appears in the opposite direction which is the side that you will be tracing from.  You may wish to write on the back side of your picture, "Trace from this side."

Using a lightbox or some other light source, trace your numbered shapes onto the adhesive of your choice.  I prefer Steam-a-seam or Heat & Bond.  If possible use the "lite" forms of these adhesives so that your finished project is not stiff.  When tracing, always extend the finish lines alittle further so that fabrics can be placed underneath the next piece. Also, trace shapes slightly bigger than original shapes. It is much easier to trim down your piece. 
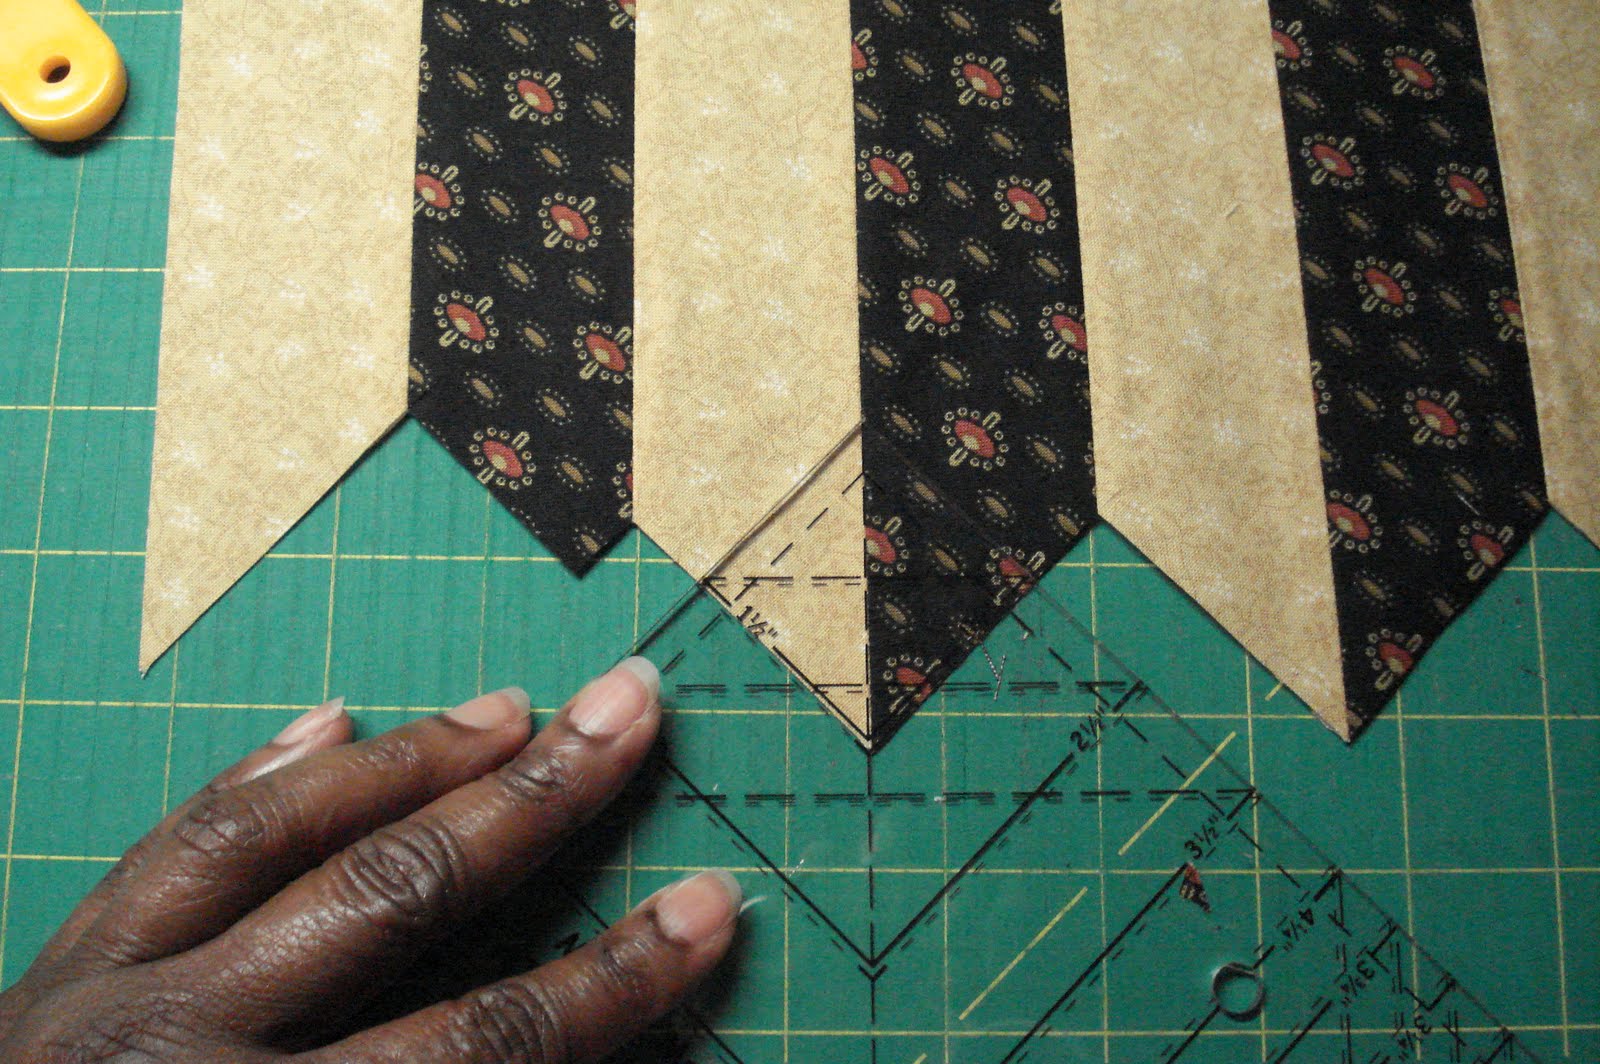
Note the little hash marks I've drawn on my pieces (pointed to with pencil), this is so that each piece can be easily placed to the next. A guide, if you will.

The applique sheet is very important because it will allows you to work with your pieces while seeing thru to your original picture.
Now for some fun!!!!
When choosing fabric, look for fabrics with undertones of other colors. This fabric is a great example of that fact.  It is brown but has gray and black undertones, great for feathers! Don't be afraid to mix in batiks or tiny prints and tone-on-tones.  Also, after you've chosen your fabrics and you're right in the middle of ironing on adhesive but you see another fabric that would also work but wasn't in your original color choices......go for it! Use it as well. There are no rules to this. If you really like it, use it.

If you are struggling with your color choices, here's a tip.  Place your choices close together and take a picture of them using the setting of  "no flash" on your digital camera then review the shot.  This setting is great when you are not sure about the depth or tone of your fabrics.


After you've ironed your adhesive cut-outs onto your fabrics, it's time to cut away the excess. I use the small scissors for this. They are much easier to manipulate.

Now, place your original picture on top of your lightbox and then the applique sheet on top of that.  Make sure that your picture in turned right-side up. Then start cutting and placing your pieces onto the applique sheet.  When you are happy with the placement, iron the pieces together.


Now you can remove the piece from applique sheet and you will be ready for the next step.
Background auditions!!!
We're getting close to the finish, so hang in there.
You're doing great!

May 26, 2010

Just In Time of the 4th! #1


In preparing for a big 4th of July celebration this year, I'm making a wall hanging or table throw.  My theme is "Freedom" which, to me, the eagle represents. 
I will be posting my progress in several stages along the way and if you'd like to join in on the fun find a picture you like of an eagle (you can google image it and there are dozens) and let's begin.


  • Once you've chose a picture, you will need to think about whether you want to have it enlarged or reduced (I go to Office Depot or Max).   Once that's decided, the next step is to take the picture apart.  Meaning trace the head, beak and talons onto a separate sheet of workable paper (tracing paper or freezer paper). Make sure you use a permanent marker. It's easier to see from the back.  A great tip is to print off a color copy of the animal you are working on. I usually copy/paste different color images of the profile, frontal view, wings outstretched, swooping, etc.
  • When dissecting the wings and feathers, work from the tail feathers up to the shoulders. Each wing or feather section should be labeled making it easier to find later.  I do no trace each feather but a group of feathers or wings.  Again these tracing should be placed on workable paper. You can easily see the sections of colored feathers on the eagle above.
  • The head and eyes are drawn last on another sheet of workable paper.


Using your color images of the chosen eagle, chose several  fabrics from your stash to work with.  I usually pull more than I'll need and sometimes chose a whole other group before I'm satisfied. Remember, if you are not sure about colors, use your color images as a guide. 
As you can see, I am leaning towards brown tones for the wings and feathers; white for the head and tail feathers and yellow for the beak and talons.  A small amount of black will be used as part of the eye and claws.
I am leaning towards a gradual changing fabric similar to the one I used in the eagle pictured above as a background. But, on matter which background you choose just make sure that your eagle body fabrics are distinct.  Small prints or fabrics that read solid are often popular in these types of quilts but geometric and batiks work well.  I think, it's really up to your own tastes in fabrics that will give you the best results.
Eventually, you will need to use a lightbox. I usually use my glass top coffee table and I have used one of those transparent wide bottom storage boxes turned upside down with a light source beneath (usually a bar shaped light). You will also need an adhesive (Steam-a-seam); a pressing mat that works with said adhesive which means the steam-a-seam doesn't stick to the mat and a #60 machine needle
In a couple of days, I will post the next steps.

May 25, 2010

Patterns.....Anyone?

So, I was cleaning out and straightening some boxes in my sewing studio when I ran across one filled with patterns that, at the time I purchased them, I had great intentions of making.  You know how that goes. They get misplaced or pushed to the back or stuffed in a box.  I have loads of them......LOL....Anyway, I've decided that it will never happen that I'm going to make any or these.....so they're up for grabs.  Just leave a comment stating your interest and on June 1st, I'll draw a name or do the random thingy and someone will be the proud owner of these great items.

May 24, 2010

Quick and Easy

Can you smell the cheeses from where you are?  The smell is making my mouth water.
Yummy!
These great tasting mini-pizzas can be made in 30 to 45 minutes with little prep involved.
Follow this link to my recipe page for a more detailed description of my Budget Pizza recipe.


May 21, 2010

Blogger's Quilt Festival Spring 2010


Amy is hosting a virtual Quilt Festival where we get to show one of our favorite quilts. This is mine.
I named it "Patriotic Me."  It was made from an idea that me and my girlfriends came up with a couple of summers ago. I knew I want an eagle and the flag as part of the quilt but I wanted to honor our Armed Forces in some way. Thus the four blocks all appliqued using my favorite adhesive.....Steam-a-seam.
This quilt was one of my proudest moments when it won First Place and Go Texan last year.
Be sure to pop over and take a look at all the wonderful entries and enter one of your quilts.  It's fun.

May 20, 2010

Beltbuckle Quilt Top Finished

Finished!  This is the "beltbuckle" quilt that Gene so gracious allowed me to make using his design.  Be sure to pop over and say "Howdy" to Gene!  
Note the final size.  Yep! It says 15 inches by 19 inches.  Let me explain why I made the mini quilt.  I had just come off a great time of making my first Feathered Star under Molly's tutelage and wanted to try my hand at the bias half squares, which, BTW, makes alot of HS.  I also really like working on small things at this point.  This, when I quilt it, is going to go on my lamp table in the livingroom.
Thank you so much, Gene!


May 19, 2010

Cowboy Up!

This quilt was made a couple of years ago for a young woman's son whose room is all about Cowboys and Texas.  It was a great stash buster.  Of course I used my favorite adhesive - Steam-a-seam (that company has nothing to worry about as long as I'm buying).  The designs are mostly my own with the exception of the rearing horse.  My good friend Kathleen is going to quilt it for the lady.....one of these days before the kid turns 21......right Kath?   hehehehehehehehe

This LINK will take you to yet another Cowboy quilt that I've done for another good friend, Carol.  Now that was a big quilt (we're talkin' California King, baby)

Now, I need to get back to the "belt buckle" quilt I'm working on from Gene's blog.   So off to the sewing studio, I go!!!

May 17, 2010

Road Trip!


It all started at Common Threads back in February. I was minding my own business when I ran across a brochure about a bus tour of 8 quilt shops (better known to us quilters as a "shop hop").  I thought little of it but my friend Jerri waved the thing in front of my face and talked about all the way back home.  At the time Jerri was very ill but still in high spirits.  We further discussed the trip and broached the idea to the other girls.  Everyone looked at their calendars to decide if their schedules would allow the trip.  I was free and signed up before a certain first deadline while the others made their decisions.  Needless to say, I was the only one who was able to make it.

My new friend, JoAnn and I had a blast teasing one another about shopping for certain colors and limiting ourselves or should I say pacing ourselves throughout the trip.  At one point on the bus, I turned around to talk to a seatmate and see two familiar faces (friends from a neighboring town). Yippee Skippy, more spending mates!!!!!


We had a fabulous 2 day road trip and visited 8 gorgeous quilt shops with the friendliest ladies you'd ever want to meet.  If you are a quilt-a-holic like I am, you might enjoy the following quilt shops:
Sitichin' Heaven - Quitman (online shop is excellent as well and lots of BOTMs)
Suzy's Quilt Shop - Garland (great Aunt Gracie selections and plenty BOTMs)
The Quilt Asylum - McKinney (WOW)
Pass Time Fabrics - Gainesville (plenty of fat quarters and great displays)
Blue Ribbon Quilt Shoppe - Wylie (great displays and fabric selections)
Cabbage Rose Quilting - Ft. Worth (solids, western and moda...oh my)
Quilt Among Friends - Arlington (florals galore)
Common Threads - Waxahachie (Civil War, Batiks, Tone-on-Tone and great BOTMs)

May 14, 2010

Beltbuckle Part2

This design is brought to you by Gene.  Make sure you pop over and pay him a visit.  Gene is a very talented guy who enjoys quilting, music, art, just to name a few.
Gene was gracious enough to allow me to make one of his designs.

It is fairly easy to chain sew your rows. I use a scrap of fabric as a beginning which you can see in the above picure.  I also, use a second scrap of fabric which is always under my needle. This way you never or nearly never have to lift your presser foot.
Clip away the scrap of fabric placing it near your machine to be used again and again.  Now my row is in 3 sections and easy to pick up and sew together.

Notice that scrap of fabric at the beginning of the row and note that the row is getting smaller as the pieces are sewn.

Here you can see how much the row shrank.
Stay tuned for more.

May 13, 2010

Beltbuckles Anyone?

My good blogging buddy, Gene (make sure you pop over to his blog and check things out) was experimenting with his EQ6 and designed a wonderful quilt, which he said reminded him of beltbuckles.  I asked his permission to try out the design and just got started.
The design called for 70 some odd half squares so I decided to  make the "Marsha, Marsha, Marsha"McCloskey's method which are on the bias.  It works so well, let me tell you. And what with using my new Shark iron with power steam, the fabric ironed like melted butter.
Of course I couldn't wait so I placed a row on my small design board and I really like what I see. I chose swirlly orange fabric (Marble Textures by Moda Classics) with lots of movement, a butter yellow and the black print fabric (Jo Morton for Andover Fabrics) is my favorite.
Stay tuned for more.

May 12, 2010

Friend or Foe

So, I was in my sewing studio minding my own business.....I had 2 machines working......embroidering on the Janome and sewing away on my Pfaff, the radio was tuned in to a 70s station, my new Shark iron hot and ready........everything was perfect........I should have know it was too good to be true!
All of a sudden, the little critter you are viewing swooped down from somewhere and landed on my neck.....at this point, I think I need to mention that I am not partial to things that fly, flutter, buzz, flitter, creep, slither, gallop, lope, etc., etc., etc.
So, I took a very dim view of the little fluttering critter landing on me......I won't bore you with what actually transpired between me and him but I will tell you that no real harm was done to the little guy......not that I didn't try......he was just deceptively quick!
In the end, I managed to get to the back door, flung it open only to trip my way outside.....at which time said critter managed to escape me!
As I was leaving the house to meet up with my girlfriends, the little guy was back, just sitting there on the cement, taunting me....what to do, what to do.......I ran back inside got my camera and snapped this photo. As if he was waiting for me to take a picture of him.....I kid you not.  Then he just flew off.  I really hope that we never cross paths again...but if we do.....I'll be loaded for bear!

Sarah's Quilt


 I posted about this quilt awhile back.....okay, it was last year.....soon after Sarah was born.......the top was made and I stuck it where I could find it later......you see what's coming don't you?.... While looking for another project, I ran across the top and...OMG.....Sarah was already One Year Old........Eeeekkkk!   I've got to get this puppy quilted like yesterday.  Thank goodness for my good friend, Kathleen.  She was kind enough to crank it out for me so that I could give it to Sarah before she turns 21...........As a bonus..(I felt really guilty for taking so long).....I made a little pillowcase from the left over fabrics........Note:  No fabric was purchased in the making of this quilt......hopefully, I decreased my stash.

May 10, 2010

A Little Sewing


My first "May" project finished.  This little quilt is a gift for my computer guy and his wife for their anniversary.  I was able to use a very small portion of my stash.......LOL
I was very proud that I was able to machine quilt it using the old stippling method.  It has been a long time since I've attempted stippling and that had been done on my Pfaff.  The Janome worked like a charm. It lowered the feed-dog and regulated the stitches whether I sewed fast or slow. 
I bound it with a scrap of tone-on tone and even managed to sew on a label. 
The quilt measures roughly 23" x 36."


May 7, 2010

"Featured" - WOW

Greetings All! I am so excited to be featured on Spinndiva Bridgett's blog.  (LINK) I'd love it if you'd pop over to her blog and take a look and please, leave her a comment.

;-}

Don't count the days, make the days count!

Hands2Help

H2H 2013 logo

LinkWithin

Related Posts with Thumbnails

Hop